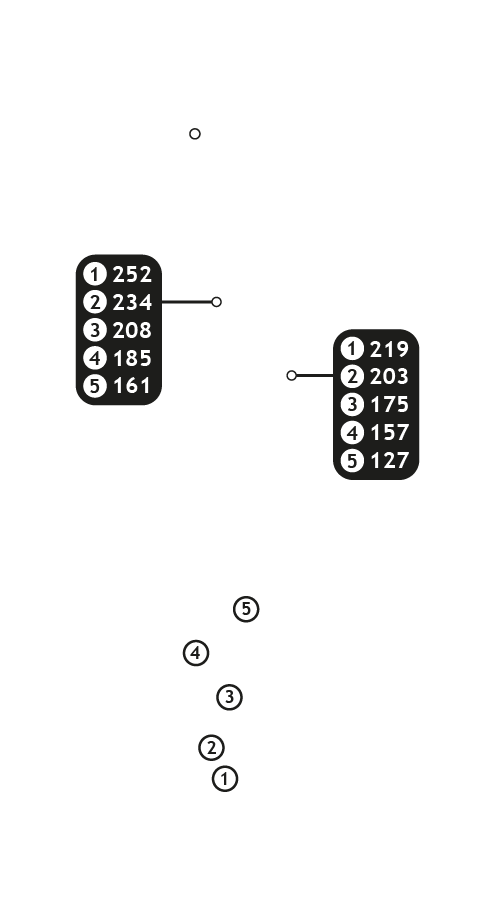
1 |
|
|||||||||
|
|
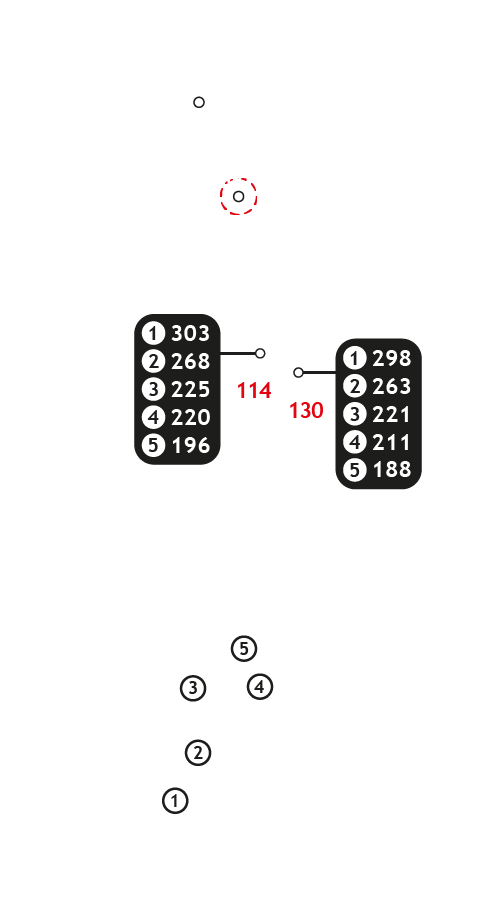
Buttons toggle between distance guide and media. See hole layout for result. If available, click icons to view media.
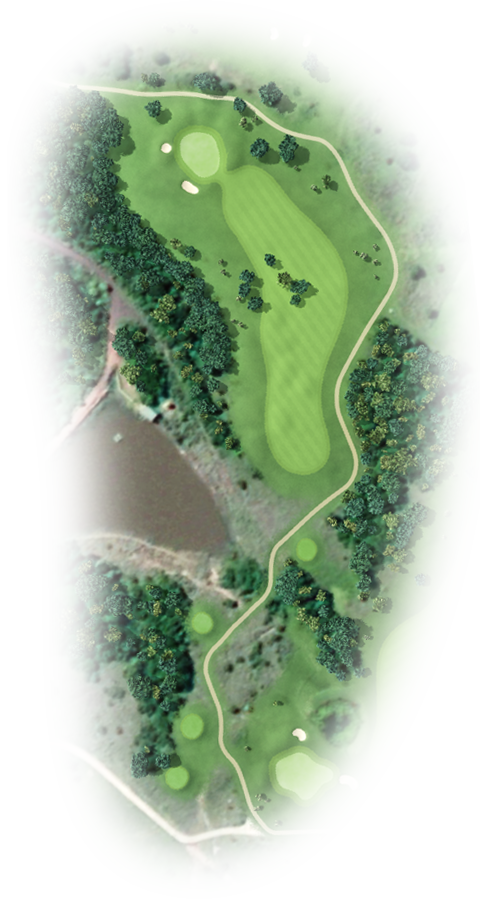
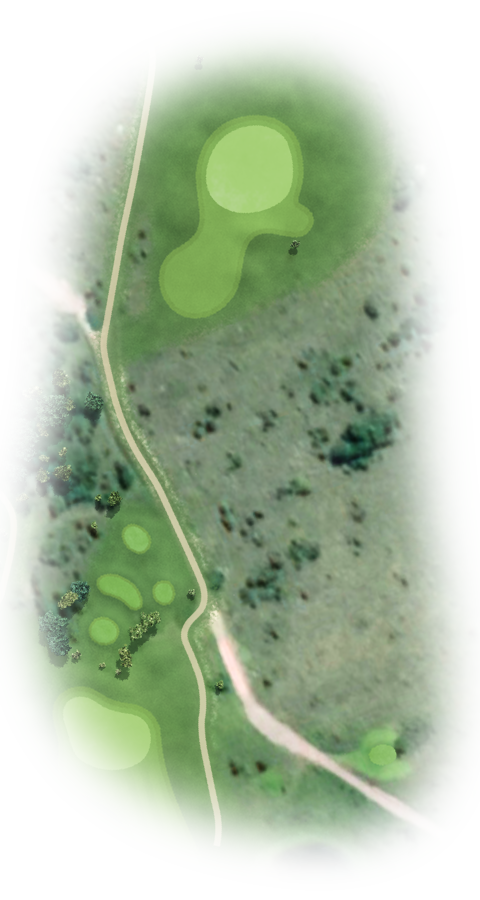
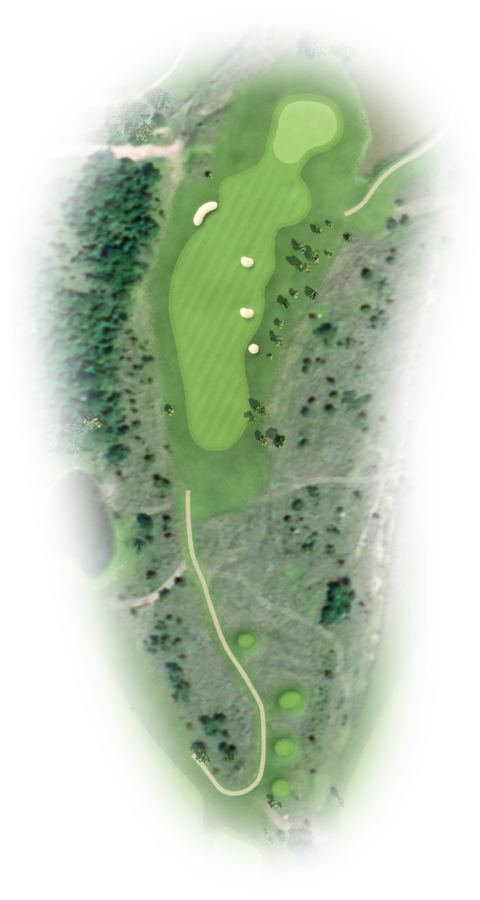
The first hole is a wonderful introduction to your round. A relatively generous fairway offers most players the opportunity to ease into the round and to open one’s shoulders with the only hazard some light rough to the left and right. Whilst lower handicappers will view this hole as a birdie opportunity, a stroke index of six ensures that golfers of all abilities must beware of the small dam and the well-placed bunkers that guard the elevated putting surface.
How to play: Longer hitters with confidence in their driver can hug the LHS of the fairway. Their second shot will play downhill with either a 3-wood or 3-iron to the green. This approach is high risk - reward as the steep bank short of the green ensures that anything short ends up wet. For the more conservative player, the RHS of the fairway is your objective. From there a second shot with a mid-iron down the LHS of the fairway will leave you a wedge off a flat lie.


2 |
|
|||||||||
|
|
Buttons toggle between distance guide and media. See hole layout for result. If available, click icons to view media.
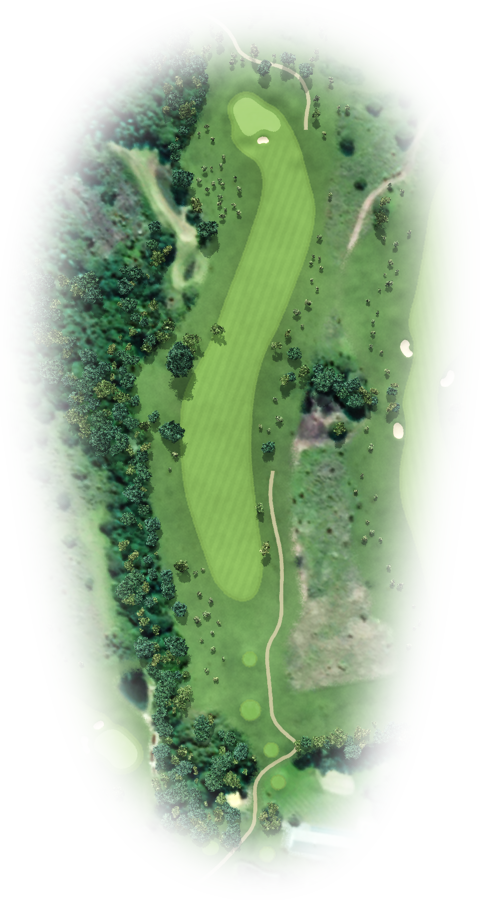
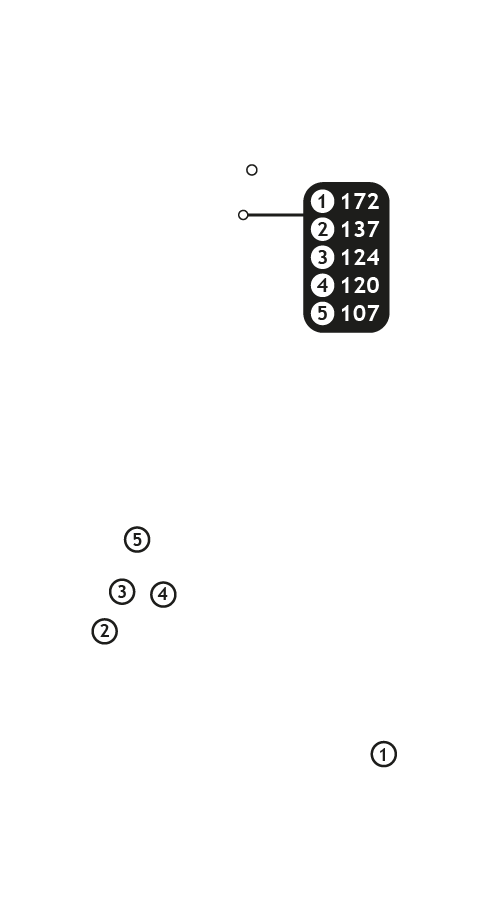
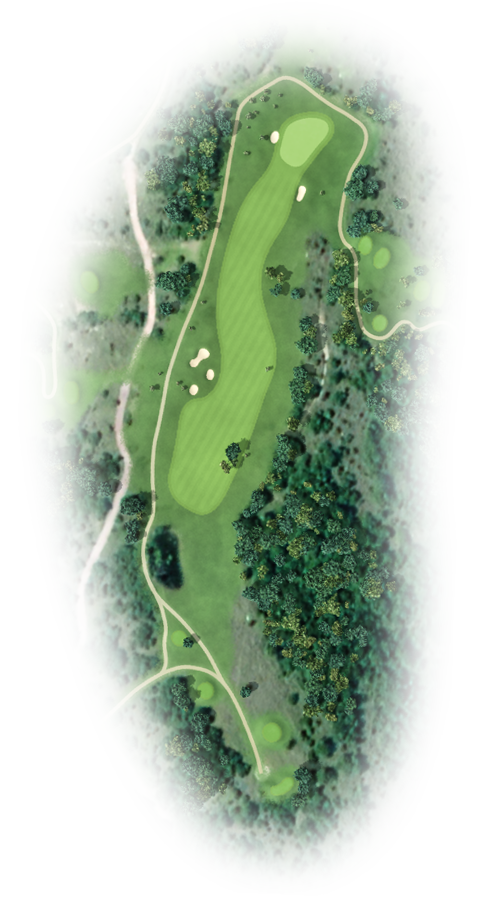
Stuart Mclean, the editor of Golf Digest, describes hole two as “a grass waterfall, gently cascading into the dam below”. This is the intimidating impression golfers have as they ready themselves for a tee shot that must clear a deep gully with heavy bush on the right and a large dam on the left.
How to play: With the tee forward, longer hitters can take the risk of going for the green. This aggressive line brings the dense coastal bush into play, as well as the bunker short of the green. The golfer preferring a cautious approach on this hole should look to play up the RHS of the fairway into the bottleneck, which then turns hard left and will leave wedge in for their second shot. Be aware of the downslope short of the green, which propels any ball landing on it to the back of the green.
3 |
|
|||||||||
|
|
Buttons toggle between distance guide and media. See hole layout for result. If available, click icons to view media.
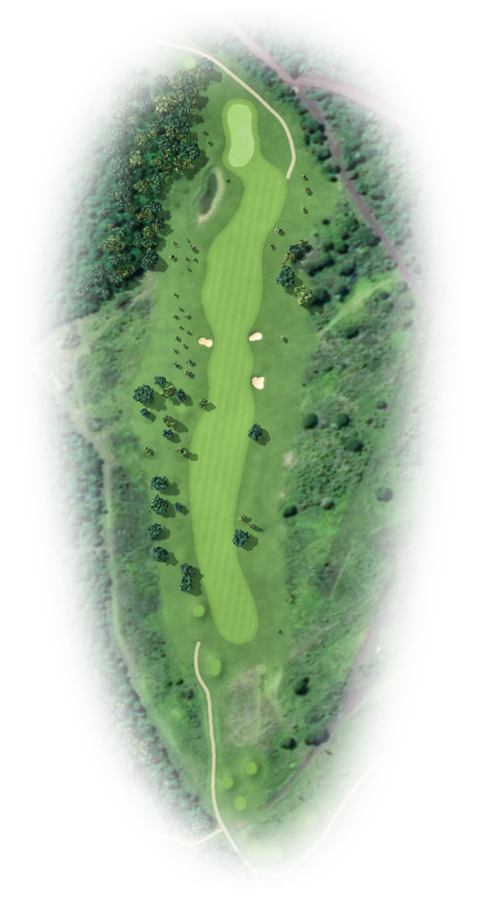
With a generous fairway, hole three slopes slightly uphill and is protected by dense bush on the left and light rough on the right, as well as strategic fairway bunkering to thwart those favouring a safe shot up the right side.
How to play: Longer hitters should look at driving the ball up the RHS of the fairway with a slight right to left ball flight, your target line being the lone Aloe on the left of the fairway bunkers. This will open up the green for your approach, but be careful of the of the slope to the right of the green. The conservative play would be to hit a 3-wood or 3-iron and leave a mid-iron approach. A full second shot should stop on the small green. Two bunkers guard against anything short, so judge the downhill slope carefully before hitting your approach.
4 |
|
|||||||||
|
|
Buttons toggle between distance guide and media. See hole layout for result. If available, click icons to view media.
Hole four marks the start of a difficult three hole stretch on the front nine. An archway of trees confronts the golfer off the tee and frames a downhill sloping fairway.
How to play: Longer hitters will love the set-up of this hole, but beware . . . your resolve will be tested, as will the ability to hit pressure shots. The tallest tree in the copse on the RHS of the fairway is the starting line for the drive which should clear the trees with ease, allowing the ball to bounce and roll from right to left with the natural shape of the fairway. A wedge for your second shot is your reward. Conservative players will note that the fairway in front of them is wide and allows them to use a long iron to play to the bottleneck. Their second shot is a mid-iron that must cover a deep bunker just short and right.
5 |
|
|||||||||
|
|
Buttons toggle between distance guide and media. See hole layout for result. If available, click icons to view media.
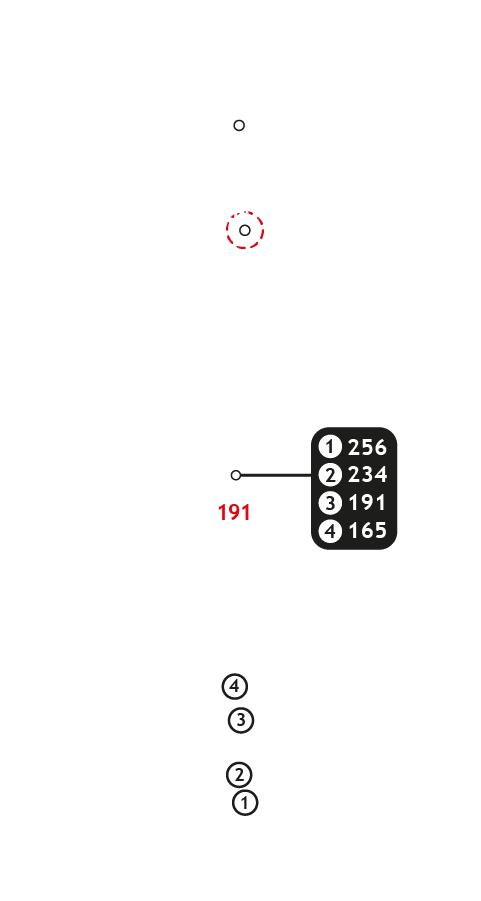
Depending on wind direction, the fifth hole can display multiple personalities. On a warm and windless day, a driver or fairway wood will set-up a simple short iron approach to a green at the bottom of a steeply sloped fairway. Misdirected tee shots will find the numerous saplings in the rough bothersome.
How to play: The only proper play here is a 3-wood or 3-iron up the right side of the fairway, allowing the ball to feed right to left with the slope, bringing you to rest a short-iron from the green, between the three fairway bunkers. Your second shot needs to be kept to the right side of the green, where again the slope will move right to left. If possible, leave your approach below the hole to allow for an uphill putt . . . anywhere else and you’re looking at your first 3-putt of the day.
6 |
|
|||||||||


|
|
Buttons toggle between distance guide and media. See hole layout for result. If available, click icons to view media.
The scenic sixth runs along a valley with spectacular views over the Chintsa River and lagoon. A narrow, slightly sloping fairway challenges shorter hitters and longer hitters the like. With a green that slopes slightly away from the fairway, beware that it is routinely the most difficult to hit in regulation, so a nett par here is a score to be proud of.
How to play: This hole appears simple from the tee, but there is a lot more to this subtle dogleg than meets the eye. With dams and bush left, the smart play is to hit your drive up the RHS of the fairway . . . but watch out for the bush on the right, it’s a lot closer than you think. Your second shot is pretty straight forward, with the large green looking inviting to any golfer, but anything long could be lost in the thick grass behind the green and anything short leaves a devilish up-and-down. The green has plenty of slopes in different directions, so second guessing yourself will leave you with a tough par putt.
7 |
|
|||||||||
|
|
Buttons toggle between distance guide and media. See hole layout for result. If available, click icons to view media.
The first par three on the course, hole seven, has a superb view of the village at Chintsa East, the river and the lagoon. The putting surface is relatively flat, but players need to be cautious as the size and subtle movement on putts makes this no simple par on the card.
How to play: Playing steeply downhill, club choice and shot shape are of the utmost importance on this tee. If the wind is blowing, players are better served by a three-quarter shot that keeps the ball down and out of the wind as much as possible. Good putting is also a focus point. Many good putters leave this green scratching their heads in disbelief.
8 |
|
|||||||||


|
|
Buttons toggle between distance guide and media. See hole layout for result. If available, click icons to view media.
The tee complexes on the eighth are one of the most attractive and memorable features of this stunning hole. With a long path winding along the side of the hill, linking the various teeing grounds with clever switchbacks, it is your drive that determines your score on this par five.
How to play: Controlling your fear is how you play this hole for the first time. A 3-wood or long iron to the right side of the “U” shaped gap in the trees is the target for your first shot. Watching the ball run right to left down the hill towards the levelled slopes is the best outcome. Your second shot will again need a 3-wood or long-iron to clear the dam and set you up for the easiest of third shots. After crossing the dam, you will have just a wedge to a green with only one bunker short and right to protect it. Again, putting is a key feature, as subtle breaks are found in all parts of the green.
9 |
|
|||||||||

|
|
Buttons toggle between distance guide and media. See hole layout for result. If available, click icons to view media.
As the last hole before your well-deserved halfway break, number nine is a short par four which plays significantly uphill and therefore slightly longer than the yardage on the card.
How to play: Longer hitters can look to attack the bunkers up the right side of the fairway on this hole and the reward is an easy pitch shot to the green only a wedge away. Conservative or shorter players have a wide fairway to aim at and the perfect line is at a fairway bunker through the fairway. This will leave a short-iron shot for your second and makes for an easy approach. However, for both of these plays, it is better to be short of the hole than long, as a dam over green awaits any overstruck shot.
10 |
|
|||||||||
|
|
Buttons toggle between distance guide and media. See hole layout for result. If available, click icons to view media.
Amen Corner. The name given to the renowned eleventh, twelfth, and thirteenth holes that can make or break any round of golf at the famed Augusta National Golf Club, home to the Masters Tournament. Olivewood’s own Amen Corner begins at the tenth with its invitingly broad fairway and light rough.
How to play: Driver off the tee is a must, but placement is key. Looking down this tunnel-like hole, the best play is up the RHS of the fairway, making it shorter to cross the water for your second shot. Once you find the wide fairway, a 3-wood is needed to clear the water. The second must hug the LHS of the split fairway due to the water hazard kinking back up towards the green and protecting the RHS of the fairway. A generous green awaits your approach, but be aware of the bunker short left.
11 |
|
|||||||||
|
|
Buttons toggle between distance guide and media. See hole layout for result. If available, click icons to view media.
The eleventh is a charming short hole set alongside the river and framed by a bamboo forest and riverine bush. Players need to always be aware of the wind, as the prevailing breeze is usually a crosswind.
How to play: Take enough club and be sure to clear the water and bunker short of the green. The shorter hitters have the option to bailout to the right, where a small fairway runs up to the green, giving you a better chance at making a par.
12 |
|
|||||||||


|
|
Buttons toggle between distance guide and media. See hole layout for result. If available, click icons to view media.
With a stroke index of one and measuring over 400 metres, hole twelve is Olivewood’s longest par 4.
How to play: A long, straight drive is a must here. Anything hugging the left or right sides of the fairway could end up requiring the player to hit a provisional. As for your approach shot, our Golf Pro likes to say: “Whatever club you think it is, take one more.” This is excellent advice due to the steep uphill short of the green, which is enough to confuse any golfer into under clubbing every time. Your putting will again be tested, especially if you find yourself on the wrong side of the green, which has split levels. A par on this hole reserves bragging rights for that player.
13 |
|
|||||||||


|
|
Buttons toggle between distance guide and media. See hole layout for result. If available, click icons to view media.
The thirteenth is the shortest and steepest par four on the course. As befits a short hole like this, the green is a true test of putting prowess, so finding the correct portion of the green with your approach is paramount.
How to play: Longer hitters need to take a risk on this hole. From the tee it seems a daunting shot, but once up by the green many a player is left rueing the chance they wasted. Plenty of space around the green allows you to miss it slightly and still be in a great position for your second to the green. The line off the tee is at the lone tree behind the green which can be seen from the tee. Shorter players will need to play towards the two fairway bunkers on the left of the fairway. This will give them a short-iron shot uphill to a sloping green. Walking away with a par here after hitting the green in regulation should be highly considered.
14 |
|
|||||||||

|
|
Buttons toggle between distance guide and media. See hole layout for result. If available, click icons to view media.
Hole fourteen is a favourite of many players, both for its views and the test it sets for golfers of all abilities. The fairway resembles a green road which climbs and curves gently upwards to an elevated green.
How to play: Considered a good birdie opportunity, a drive straight at or just to the right of the second fairway bunker leaves you with an approach shot that is pretty straightforward. With the hole being a slight dogleg to the right, there is always going to be natural protection on the left side of the green. In this case a greenside bunker awaits any errant approach, although from the fairway, you are unable to see it. Hitting a longer drive on this hole is a plus, as the green is deep and often the golfer finds himself short due to the natural elevation of the hole.
15 |
|
|||||||||
|
|
Buttons toggle between distance guide and media. See hole layout for result. If available, click icons to view media.
Olivewood’s signature hole, number fifteen, is certain to remain in a golfer’s memory long after the round is over. The tees and green are on opposite slopes of a deep, formidable, forested ravine which leaves players with only one option: clear the hazard or hit another tee shot. As a concession to the difficulty the wind can create, the middle and forward tee complexes are set closer to the ravine, effectively reducing the length of the shot.
How to play: Hitting the green is paramount. Make sure you carry both the dense bush in front of the tee, and the two deep bunkers short of the green. It is better to be long rather than short on this hole, with a steep embankment behind the green helping any ball that is overhit back towards the green. This is one of the hardest greens on the course to putt on, so keep a steady stroke.
16 |
|
|||||||||


|
|
Buttons toggle between distance guide and media. See hole layout for result. If available, click icons to view media.
The natural ruggedness, narrow fairway and dogleg of the sixteenth reminds many members of number fourteen. This hole is, again, an excellent example of the risk and reward philosophy that typifies many of Olivewood’s par fours.
How to play: A 3-wood or long iron up the RHS of the fairway to short of the fairway bunkers is the best play, as it keeps the elevated green visible at all times. Your second shot will be from a mid to long-iron, but take an extra club to avoid ending up in the dam short of the green. Your bailout area is to the right of the green, but with a bunker strategically placed for those looking to steer clear of the bush and water, your shot will have to be accurate to give you a good chance for an up and down. When looking at the green, you can see the many breaks in it, so make sure to pay attention when approaching it to catch glimpse of the putt you will have.
17 |
|
|||||||||
|
|
Buttons toggle between distance guide and media. See hole layout for result. If available, click icons to view media.
Hole seventeen offers players panoramic vistas of the fourth and eighteenth fairways, as well as of the clubhouse and restaurant in the distance. Although a relatively short par three, this hole is especially tricky when the wind is up. The putting surface has a slight back to front slope and so speed control on approach putts is vital.
How to play: Short and long will find you in deep bunkers, which make a par on this hole impossible. The correct play on this shot is to keep to the LHS of the green and to make sure that you have the correct club. Once on the green, be aware of the speed and the subtle breaks.
18 |
|
|||||||||
|
|
Buttons toggle between distance guide and media. See hole layout for result. If available, click icons to view media.
Olivewood’s closing hole is a short par five where birdie opportunities abound. Whatever score you pencil in, Olivewood’s renowned 19th Hole will always lie open, just beyond the trees, offering celebrations or commiserations.
How to play: Open your shoulders and hit driver . . . firstly because it is your last hole and secondly because there is no real danger off the tee, except the two fairway bunkers. The best line is the RHS of the fairway as it helps open the gap up between the trees on this dogleg left. For your second shot there is no real danger, so lay-up to your favourite distance. The third shot will need to be placed expertly. A bunker protects the green on the right and thick rough surrounds a putting surface with many levels . . . concentration is important so that you do not end your round with a three putt.