1 |
|
|||||||||
|
|
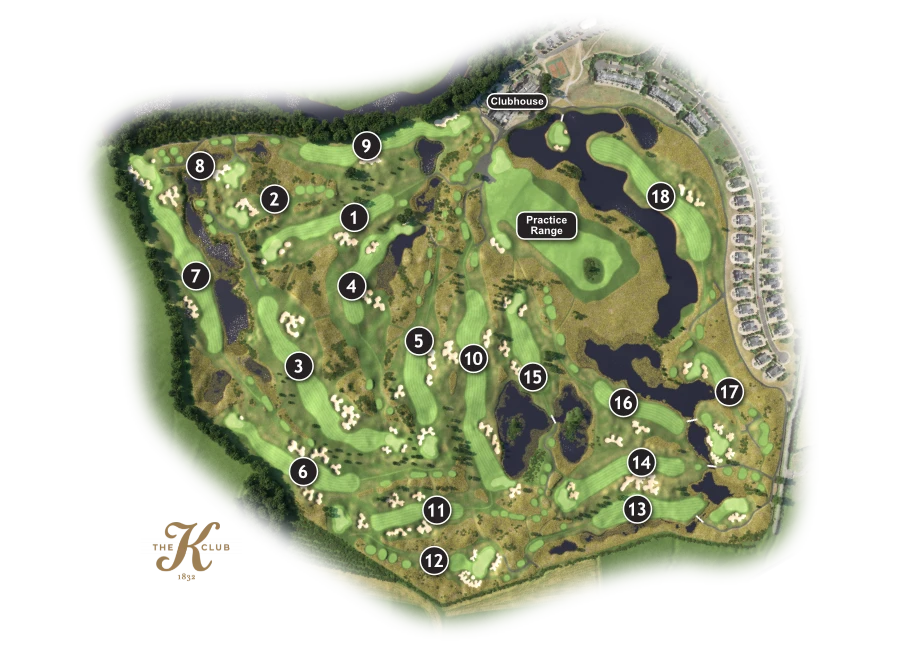
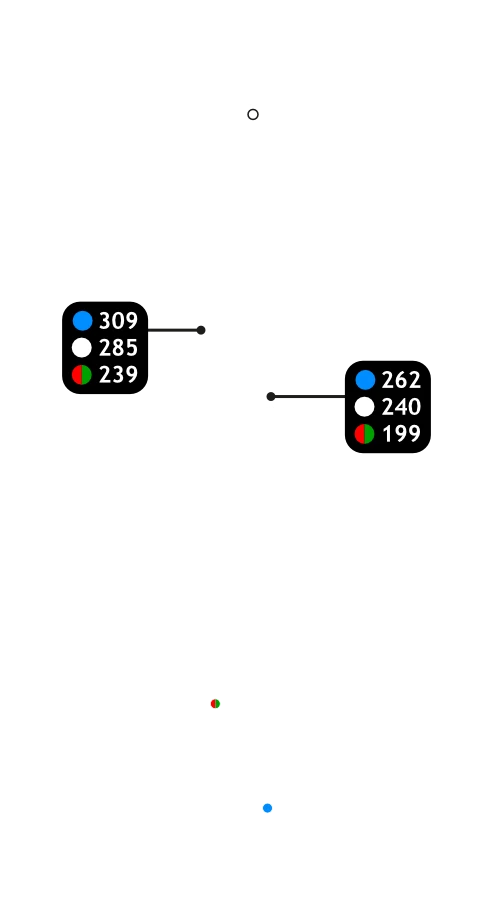
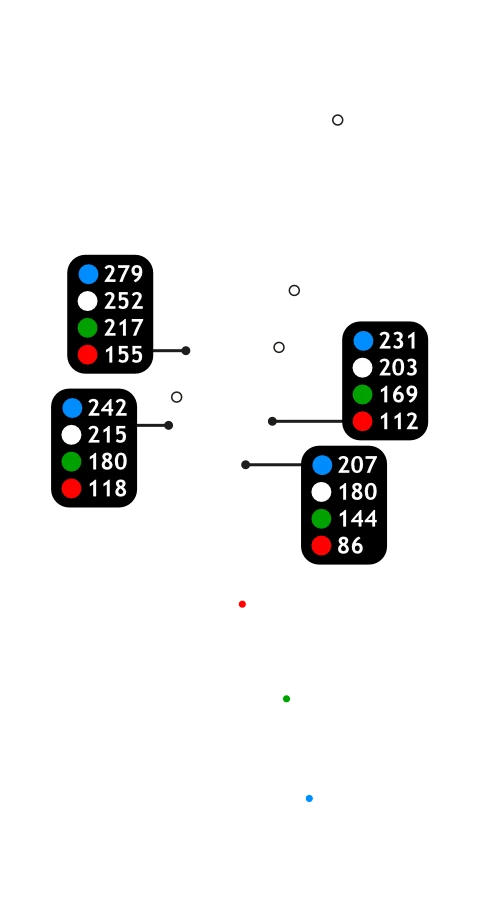
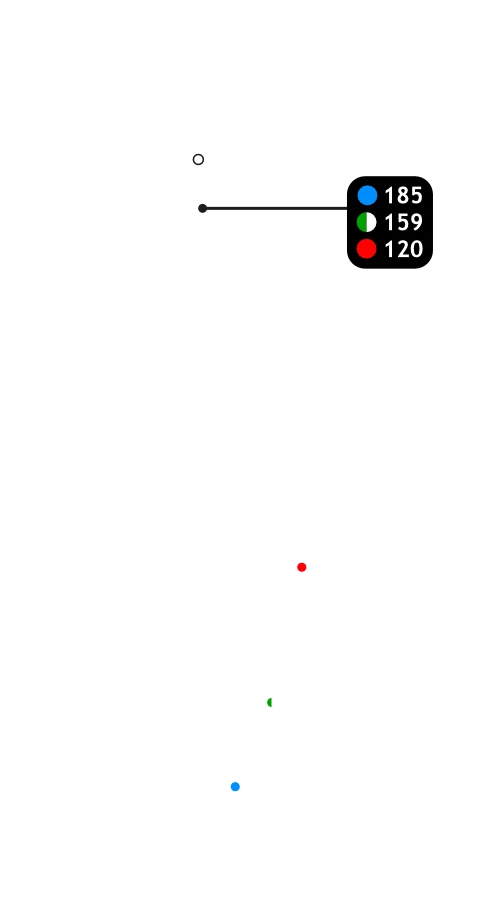
Buttons toggle between yardage guide and media. See hole layout for result. If available, click icons to view media. All yardages measured from middle of tees.
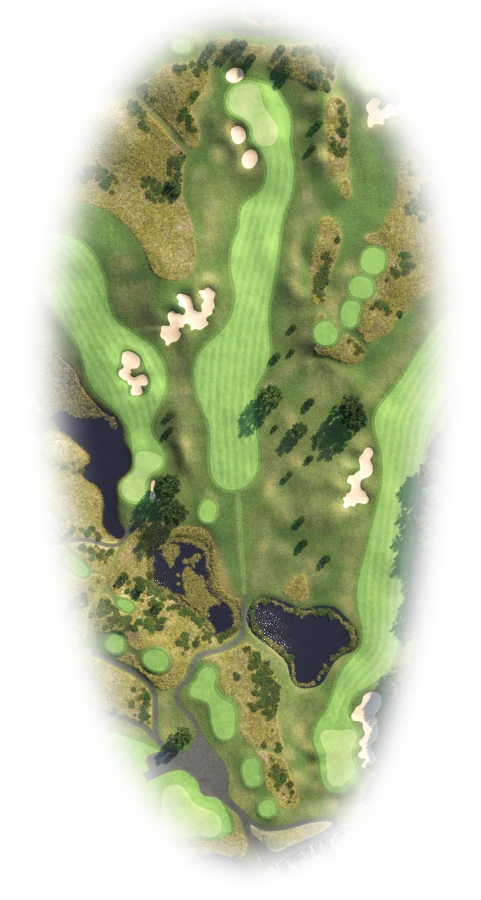
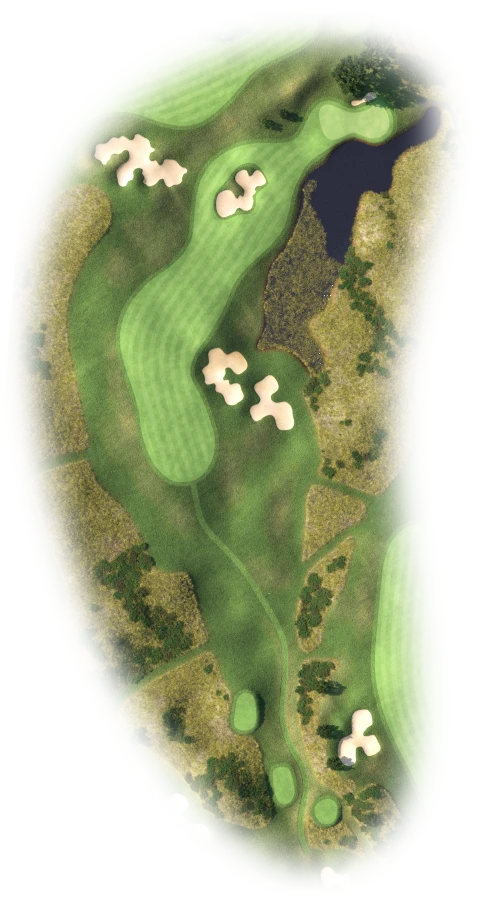
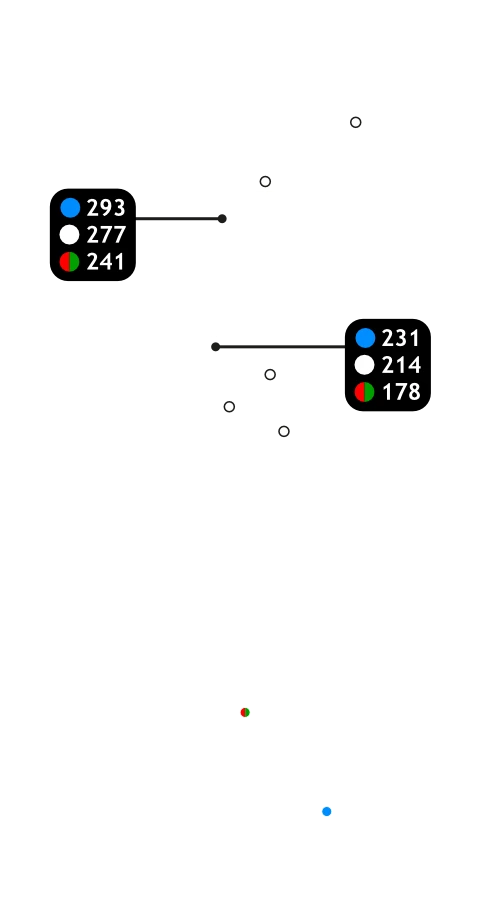
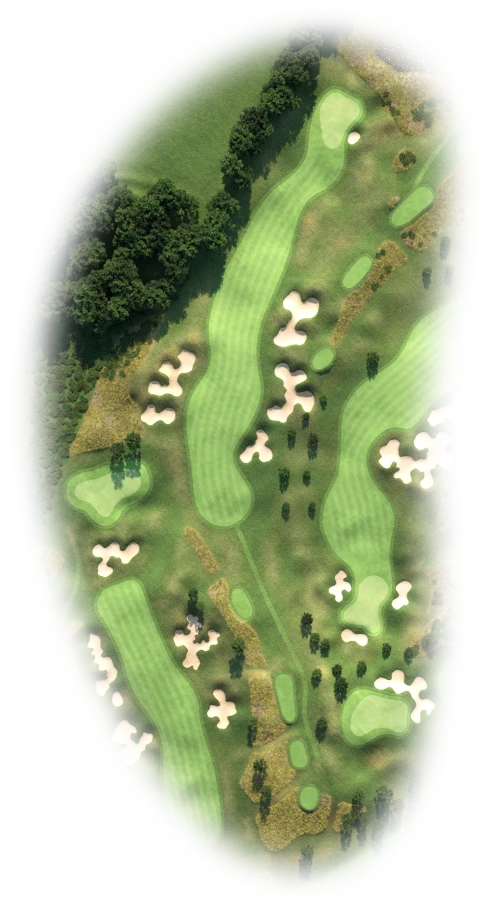
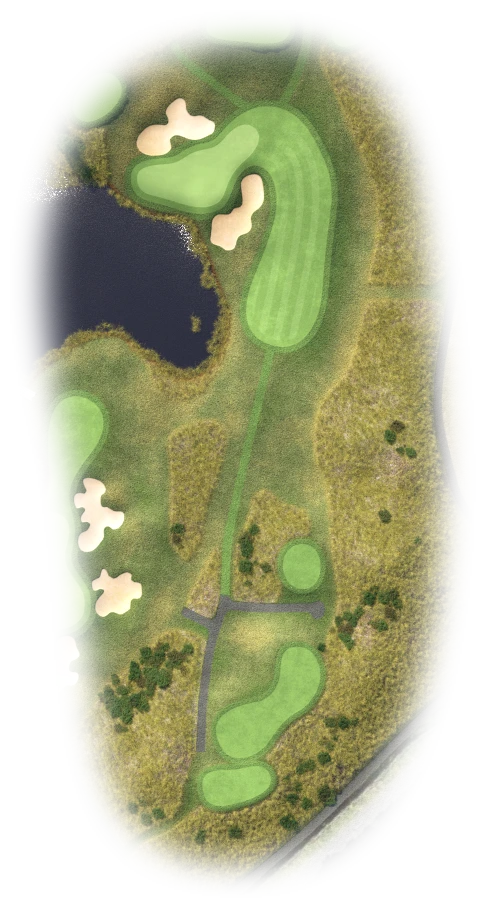
A very good hole to open with and an excellent foretaste for the challenges ahead. A drive straight up the middle is needed here to miss the trees on the right and the large fairway bunker left. A medium to long iron will be required for your second to this large, two-tiered green. Make sure you take enough club to get over the front bunker.

2 |
|
|||||||||
|
|
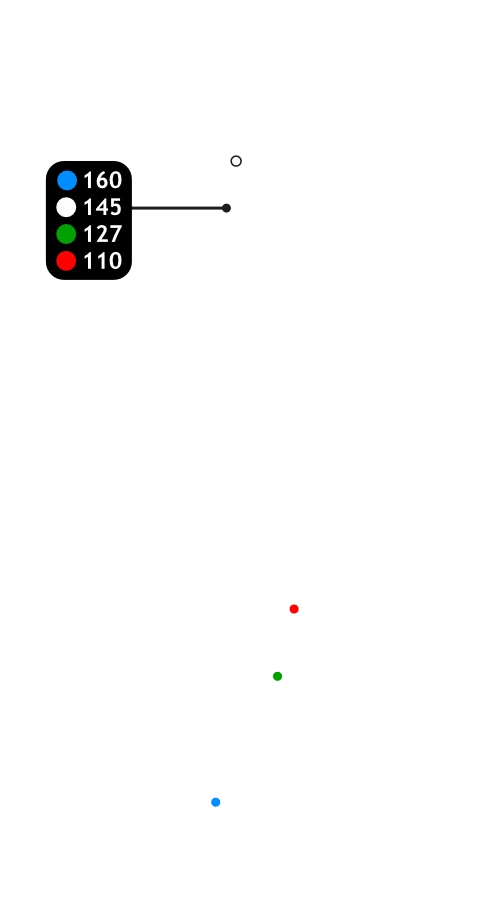
Buttons toggle between yardage guide and media. See hole layout for result. If available, click icons to view media. All yardages measured from middle of tees.
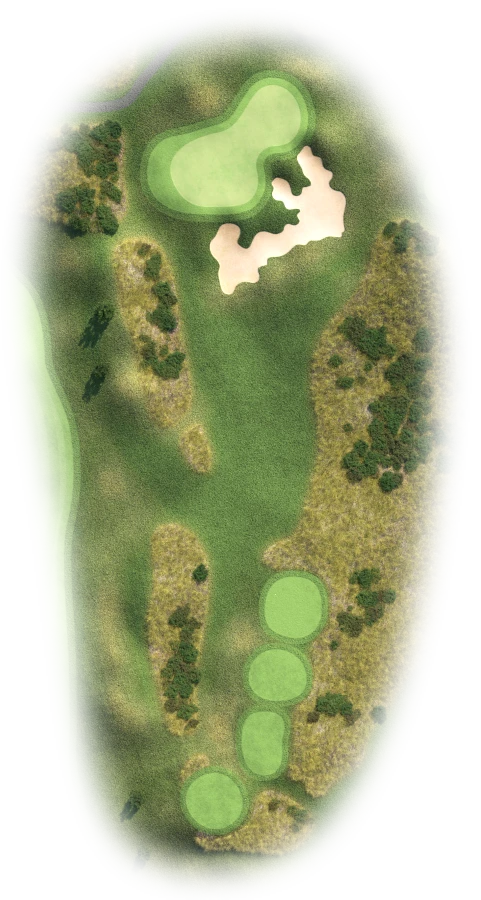
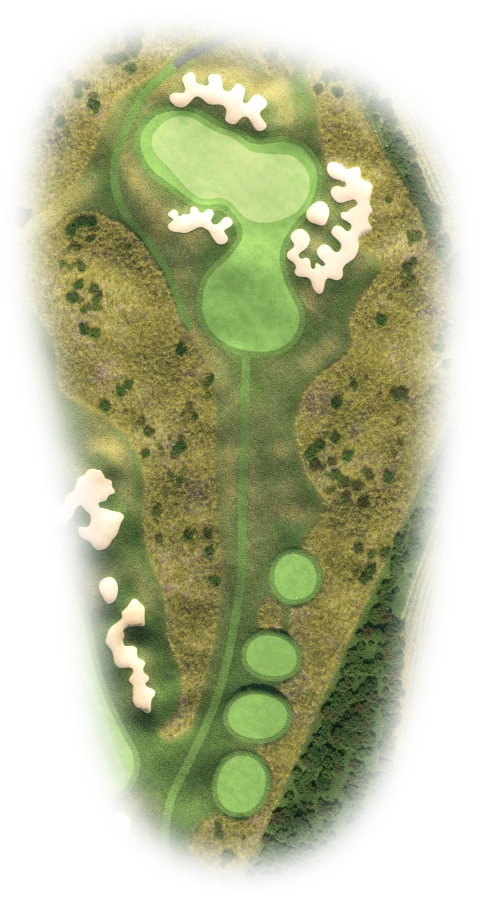
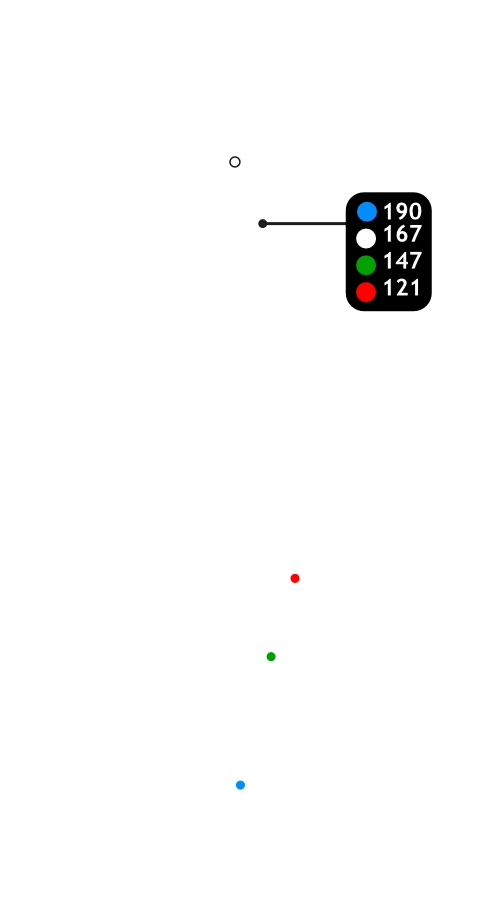
The first of an excellent set of short holes. Don’t be put off by the huge cavernous bunker at the front of the green - work out your yardage, select the right club to ensure you carry the ball all the way and concentrate on hitting the ball smoothly. If the pin is at the back you must take enough club to get over the small ridge in the green, otherwise you will be left with a long and difficult putt.
3 |
|
|||||||||
|
|
Buttons toggle between yardage guide and media. See hole layout for result. If available, click icons to view media. All yardages measured from middle of tees.
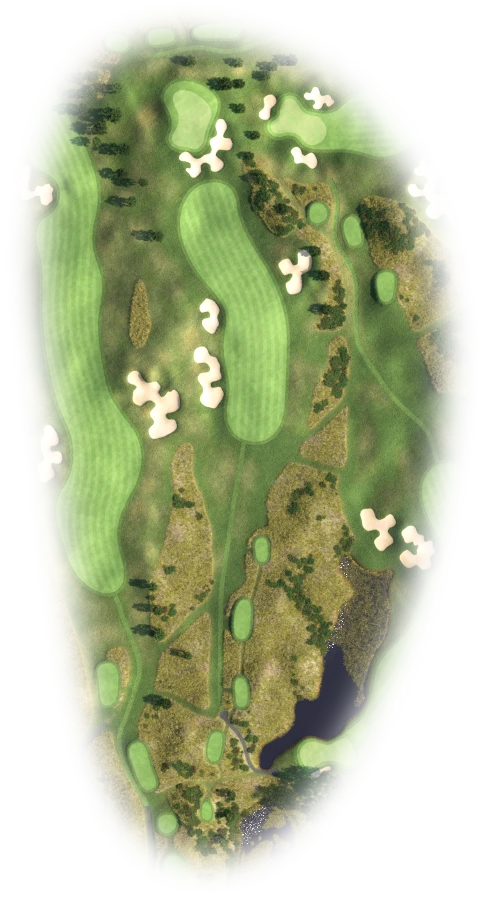
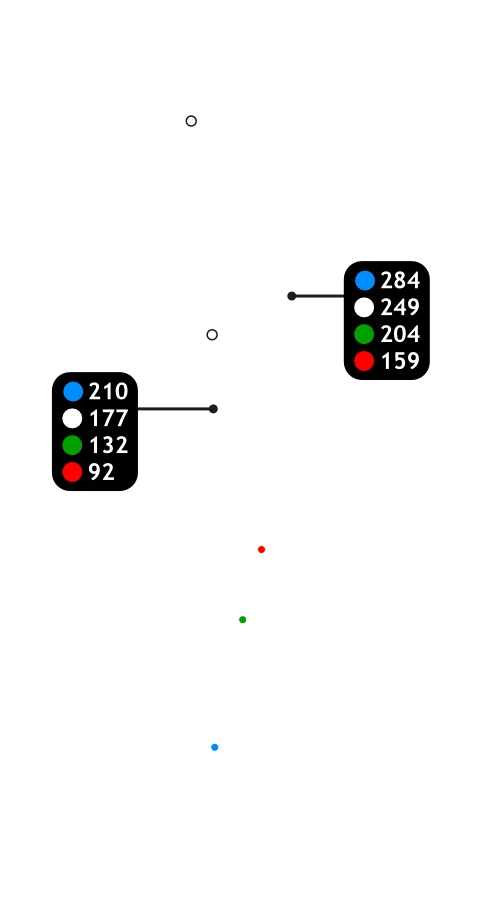
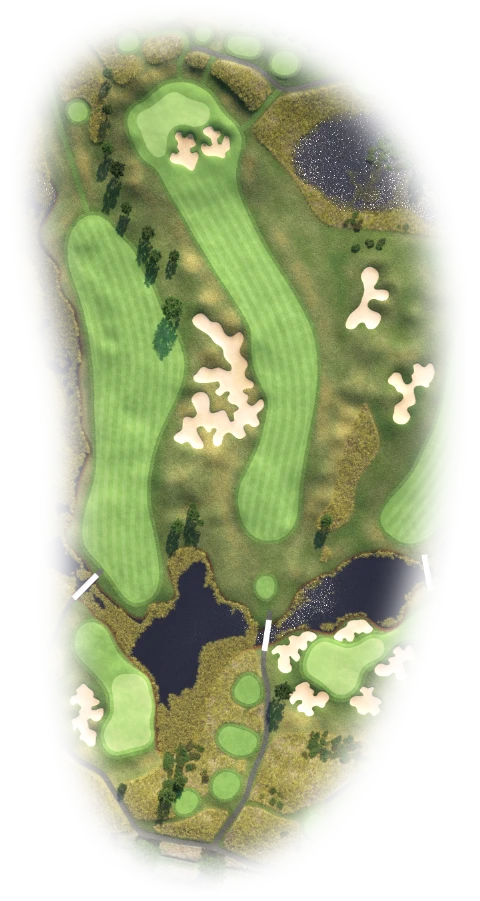
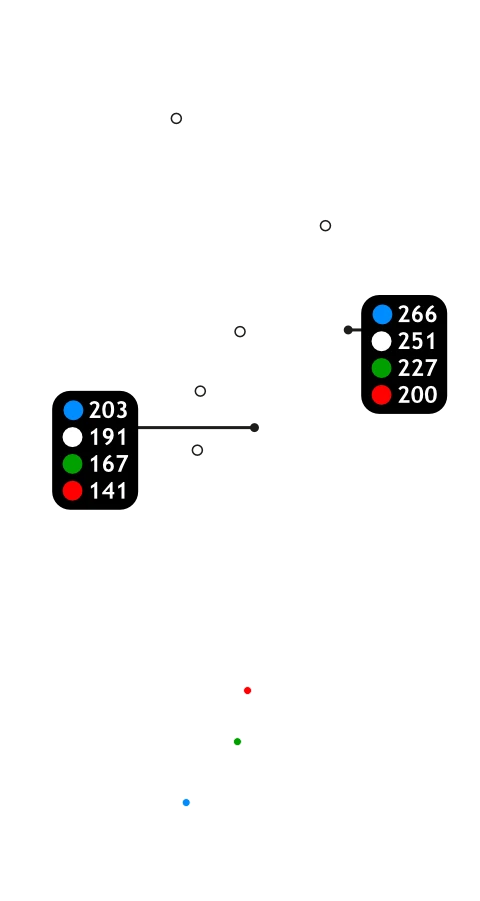
The longest Par 5 on the course where only the very longest of hitters can reach in two. A semi-blind tee shot which must be threaded between the fairway bunkers - straight up the middle is best! With your second lay up to the right of the second set of fairway bunkers, leaving a short pitch onto the two-tiered green.
4 |
|
|||||||||
|
|
Buttons toggle between yardage guide and media. See hole layout for result. If available, click icons to view media. All yardages measured from middle of tees.
A tricky Par 4 with plenty of danger lurking! Keep left of the fairway bunkers off the tee to put you in the right position for your second shot, which must be straight as anything drifting to the right will more than likely find the pond.
5 |
|
|||||||||
|
|
Buttons toggle between yardage guide and media. See hole layout for result. If available, click icons to view media. All yardages measured from middle of tees.
Generally playing into the prevailing wind, a good drive will leave you with a short to medium iron for your second shot. This is a two-tiered green so check where the pin is to determine your yardage to the right level, but more important take enough club to make sure you get over the front bunker.
6 |
|
|||||||||
|
|
Buttons toggle between yardage guide and media. See hole layout for result. If available, click icons to view media. All yardages measured from middle of tees.
Threading your drive between the fairway bunkers is the key to this hole, so be wary of biting off too much! Work the yardage out for your second carefully as you are probably not going to see the bottom of the flag. No hooks here as it is Out Of Bounds all the way down the left.
7 |
|
|||||||||
|
|
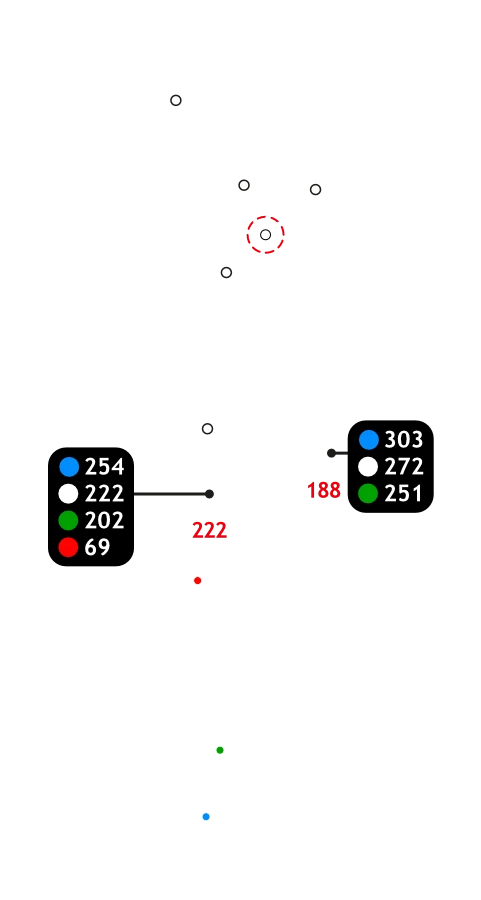
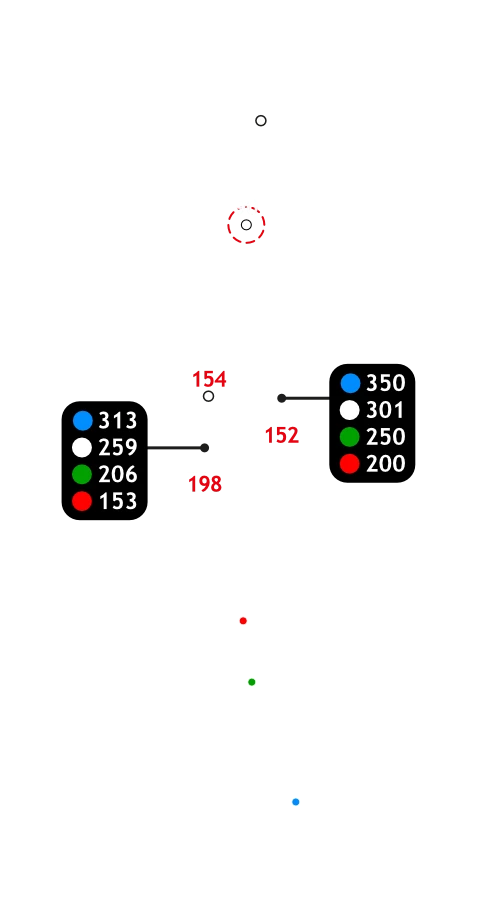
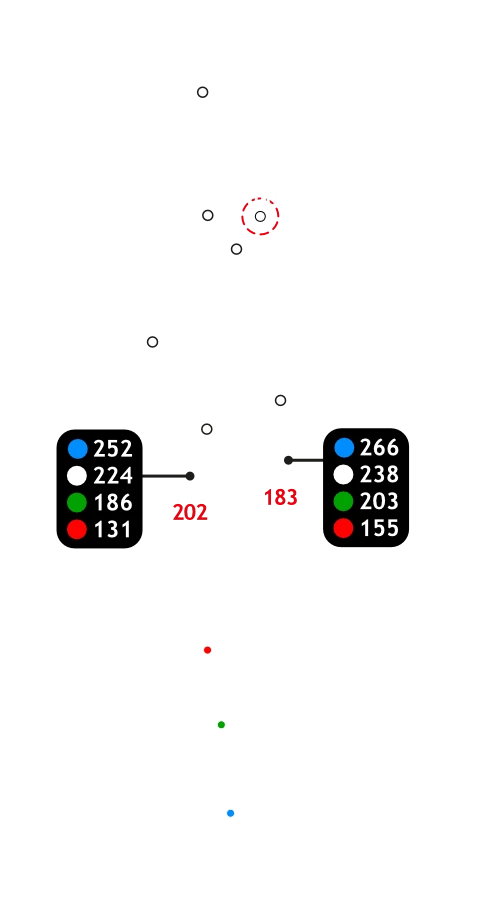
Buttons toggle between yardage guide and media. See hole layout for result. If available, click icons to view media. All yardages measured from middle of tees.
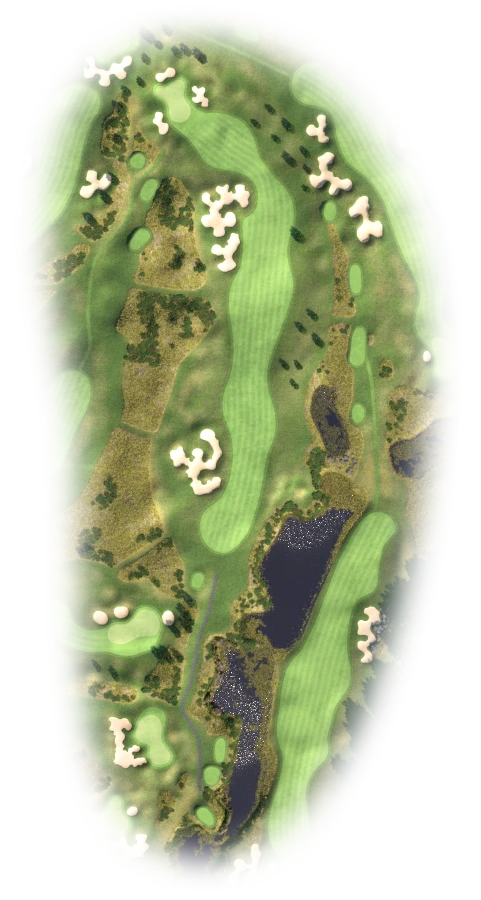
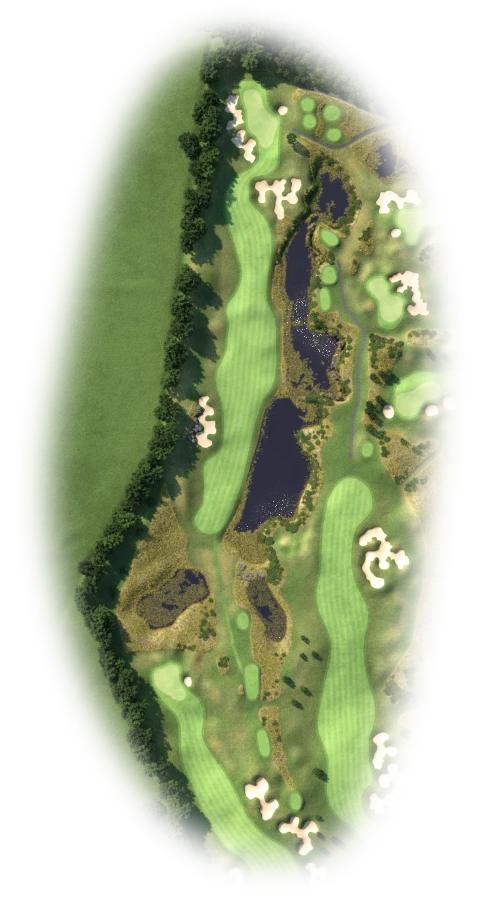
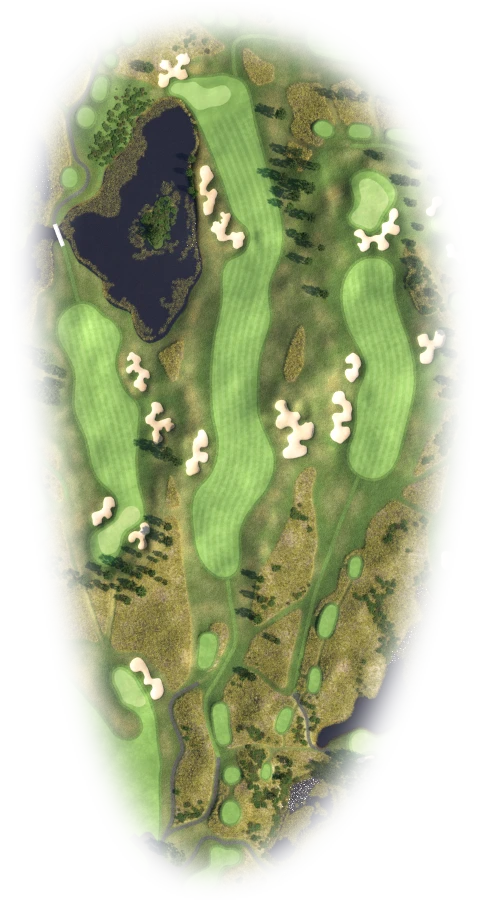
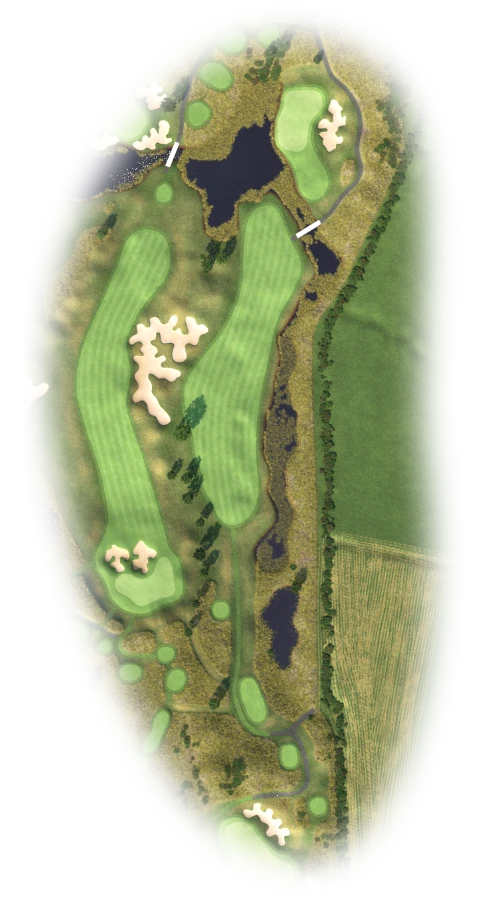
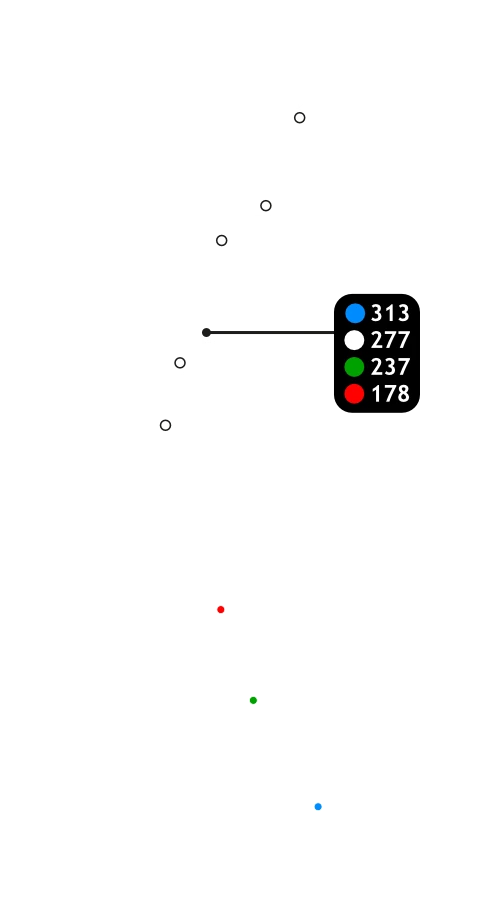
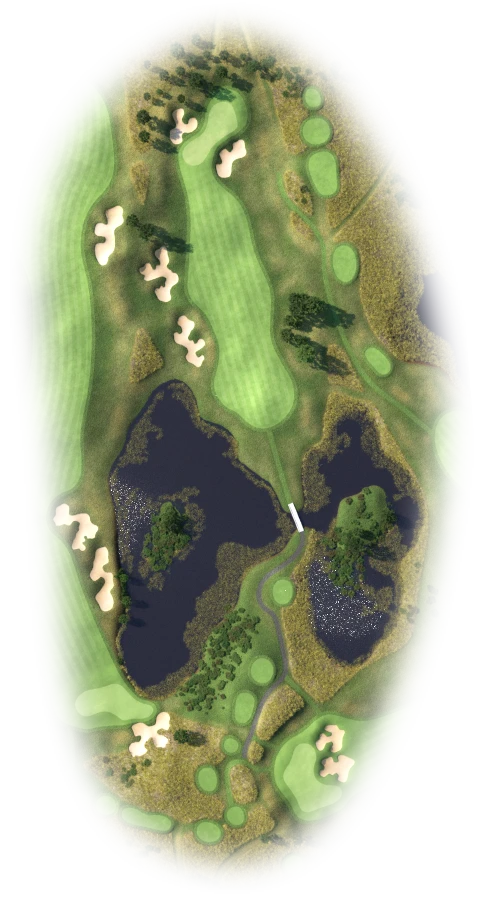
A really good long Par 5 and one of the best holes on the course. A definite three shotter, particularly if you are playing from the back tee. With water nearly all the way down the right and Out Of Bounds down the left, this hole needs to be treated with respect. Probably the safest way to play this is to drive short of the left fairway bunker, put your second short of the right fairway bunker, then rely on a good pitch to this very long green. Good luck and enjoy!
8 |
|
|||||||||
|
|
Buttons toggle between yardage guide and media. See hole layout for result. If available, click icons to view media. All yardages measured from middle of tees.
Watch out for this hole, as although it is short it has a very difficult green. Find the right level and you may well be rewarded with a good chance to go for a birdie. Make sure you work out your yardage properly to ensure you take enough club to carry all the way to the putting surface - anything short and you will very likely be looking at a bogey or more.
9 |
|
|||||||||
|
|
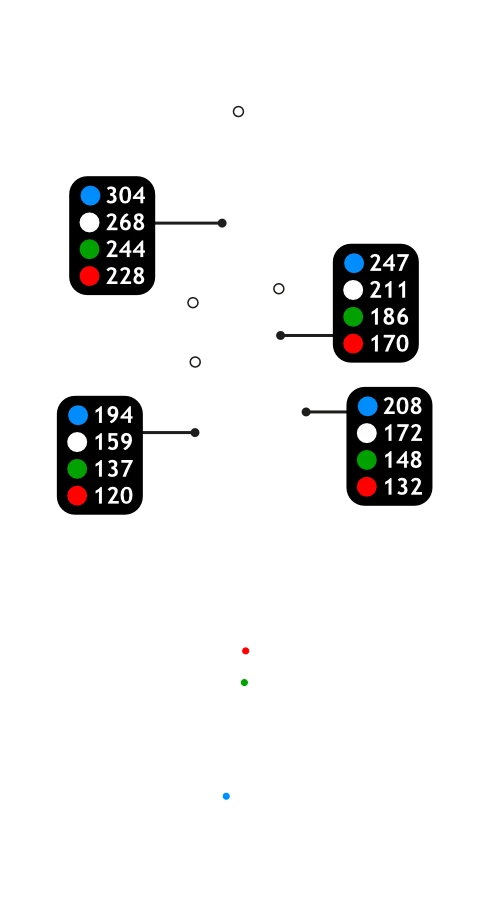
Buttons toggle between yardage guide and media. See hole layout for result. If available, click icons to view media. All yardages measured from middle of tees.
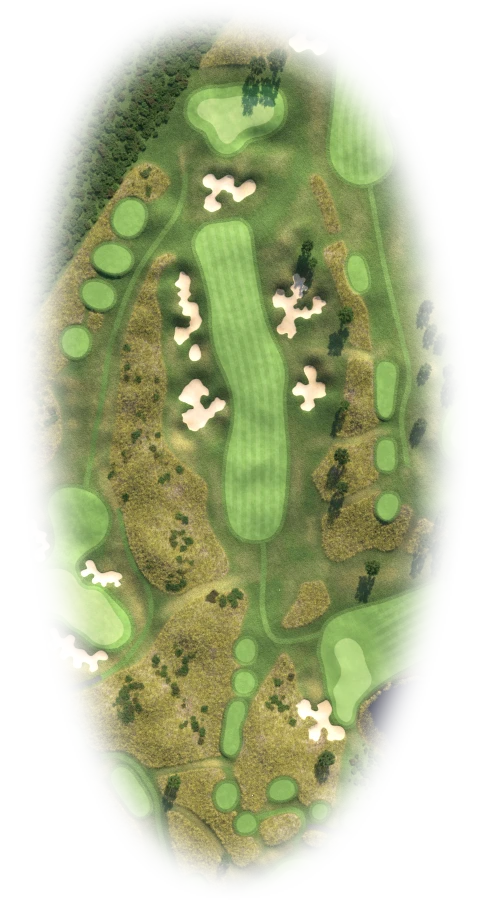
A difficult and long Par 4 to finish the front nine with. Bordered by dense trees all the way up the left, anything going left will certainly end up in trouble. The second shot is also very demanding, as it must be long and straight to this narrow green. Once on, the green has numerous contours which make for some interesting putts!
10 |
|
|||||||||
|
|
Buttons toggle between yardage guide and media. See hole layout for result. If available, click icons to view media. All yardages measured from middle of tees.
This hole generally playing directly into the prevailing wind, but for the longer hitters the green can definitely be reached in two, so it is a good birdie chance. Get your yardage right for your second shot, or third if you lay up, as anything a bit short could be gathered in the dip short of the green. The green itself is quite wide, but not very deep, so your clubbing has to be right.
11 |
|
|||||||||
|
|
Buttons toggle between yardage guide and media. See hole layout for result. If available, click icons to view media. All yardages measured from middle of tees.
This hole climbs back up the hill, but a good straight drive should set you up for a short to mid iron second shot. The green is considerably elevated when viewed from the fairway - the front bunker is about 25 yards short of the green, which will tend to foreshorten your view. Work out your yardage so that you take the right club to carry you all the way to the putting surface.
12 |
|
|||||||||
|
|
Buttons toggle between yardage guide and media. See hole layout for result. If available, click icons to view media. All yardages measured from middle of tees.
This hole has one of the widest greens you will see anywhere, some 70 yards across, so you need to aim at the flag unless you want to leave yourself an exceedingly long putt! Having said that, the green is not very deep, particularly on the left side, so make sure you get the right club to land on the green and hold.
13 |
|
|||||||||
|
|
Buttons toggle between yardage guide and media. See hole layout for result. If available, click icons to view media. All yardages measured from middle of tees.
An excellent test of golf, this hole needs some straight and long hitting to get on in two. The big problem is that water is all the way down the right and short and left of the green. Your drive should favour the left side of the fairway, to give you the best possible view of the green. Remember that your second has to carry all the way!
14 |
|
|||||||||
|
|
Buttons toggle between yardage guide and media. See hole layout for result. If available, click icons to view media. All yardages measured from middle of tees.
A relatively short dog-leg Par 4, but it still requires some accurate shot making. Middle to right half of the fairway is best for the drive, to give you the best line for your second. The second shot plays considerably longer than it looks, so you would be advised to take an extra club. If the pin is back right, make sure you know the yardage so that you can select the right club to carry you over the front bunkers.
15 |
|
|||||||||

|
|
Buttons toggle between yardage guide and media. See hole layout for result. If available, click icons to view media. All yardages measured from middle of tees.
Generally played downhill, this is a good chance to get off a long drive, leaving a short pitch with your wedge or 9 iron. An excellent birdie opportunity and one you should try to take advantage of before the closing three holes.
16 |
|
|||||||||

|
|
Buttons toggle between yardage guide and media. See hole layout for result. If available, click icons to view media. All yardages measured from middle of tees.
The toughest hole on the course and deservedly so. A drive down the left side of the fairway is best to set up the easier approach, but it will take some confidence to do so. The green is very well protected all round by bunkers, as well as water short and right. A well struck second is needed here, as anything drifting right will probably end up in the water.
17 |
|
|||||||||
|
|
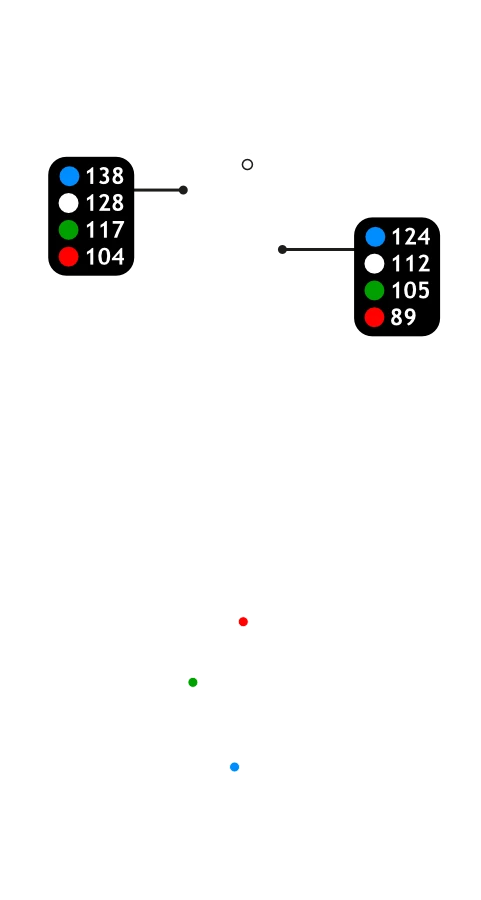
Buttons toggle between yardage guide and media. See hole layout for result. If available, click icons to view media. All yardages measured from middle of tees.
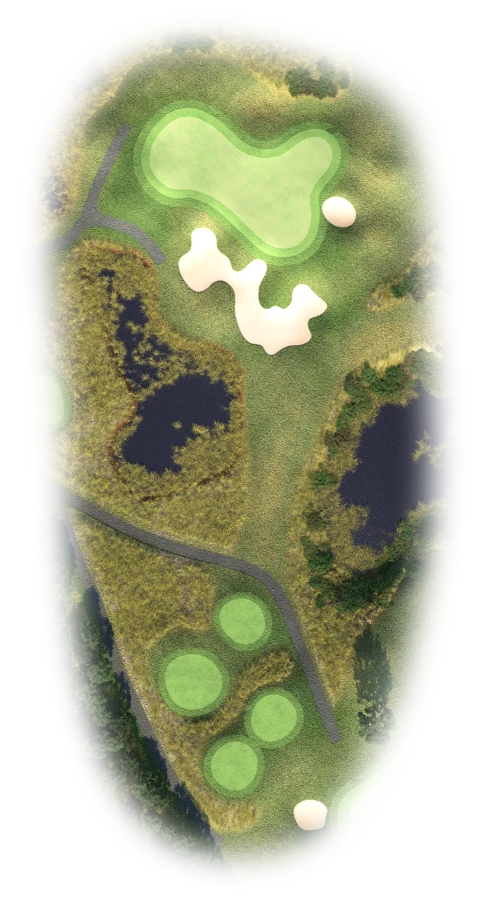
A very pretty Par 3, needing a really well struck shot to reach the target. Anything short or left could easily lead to a bogey or worse. The wisest tee shot is one aimed at the middle of the green, then trust your putting skills.
18 |
|
|||||||||
|
|
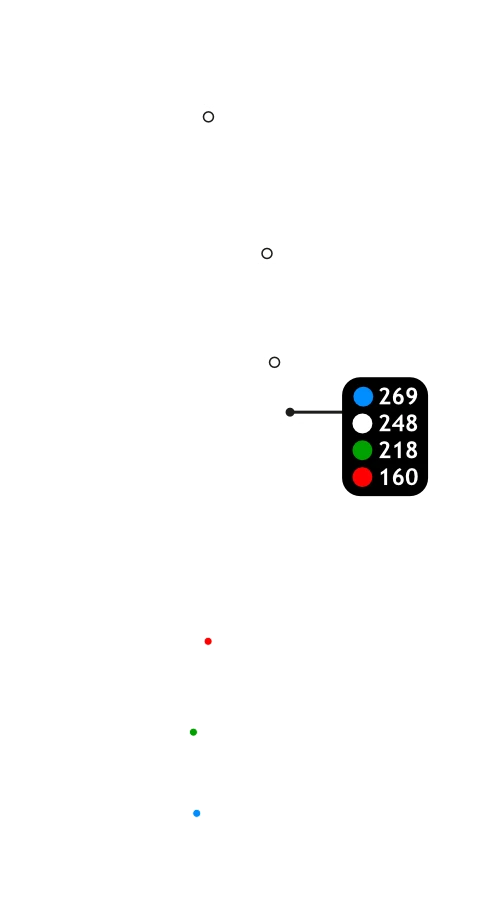
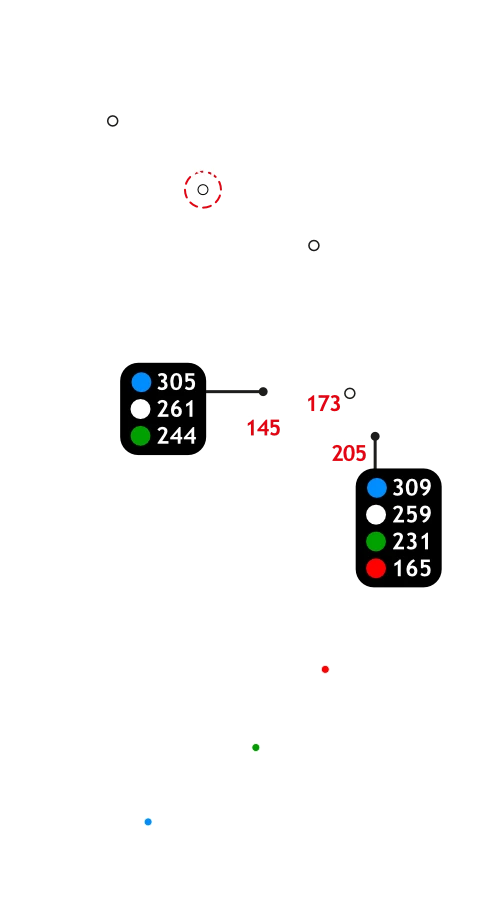
Buttons toggle between yardage guide and media. See hole layout for result. If available, click icons to view media. All yardages measured from middle of tees.
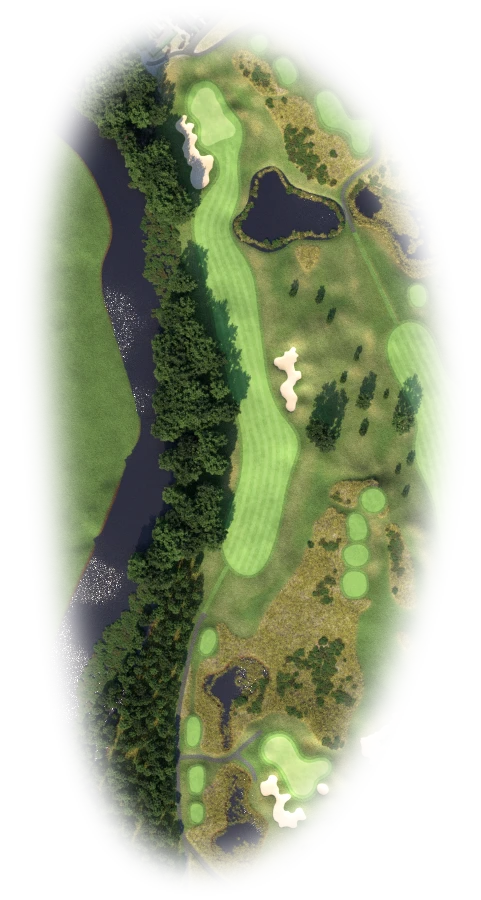
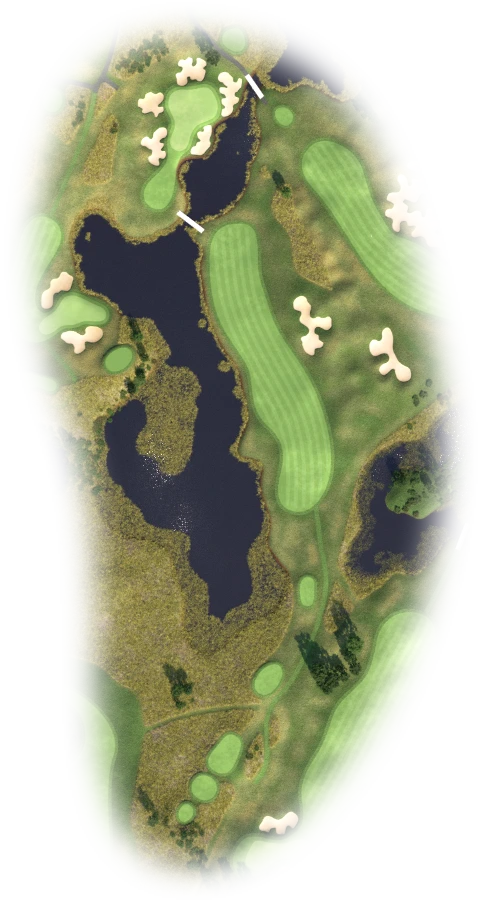
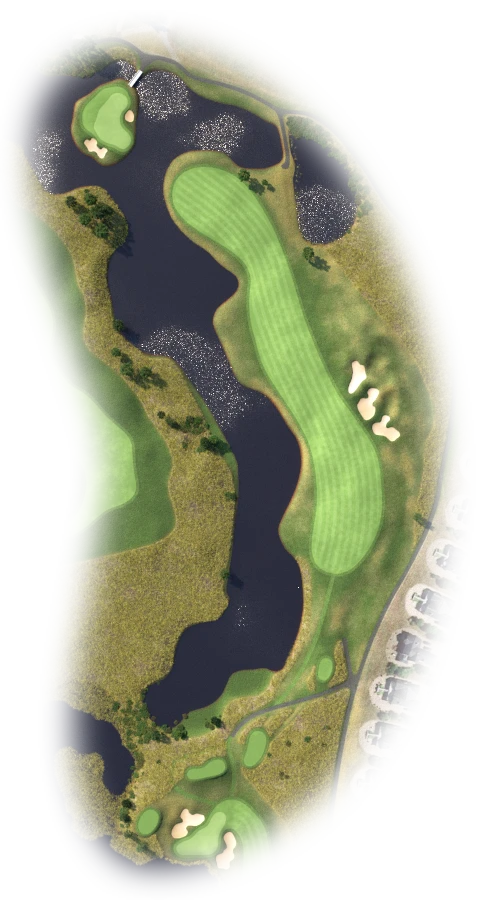
A hole made for long hitters, provided they want to exercise the risk/reward scenario of trying to hit this island green in two. A great hole to finish with, but be careful you don’t try to chew off too much down the left, as there is plenty of room on the right. If you can’t reach the green in two, lay up between the two ponds, leaving a short iron in to try and get close enough for a finishing birdie. Now that would be something to celebrate!