1 |
|
|||||||||
|
|
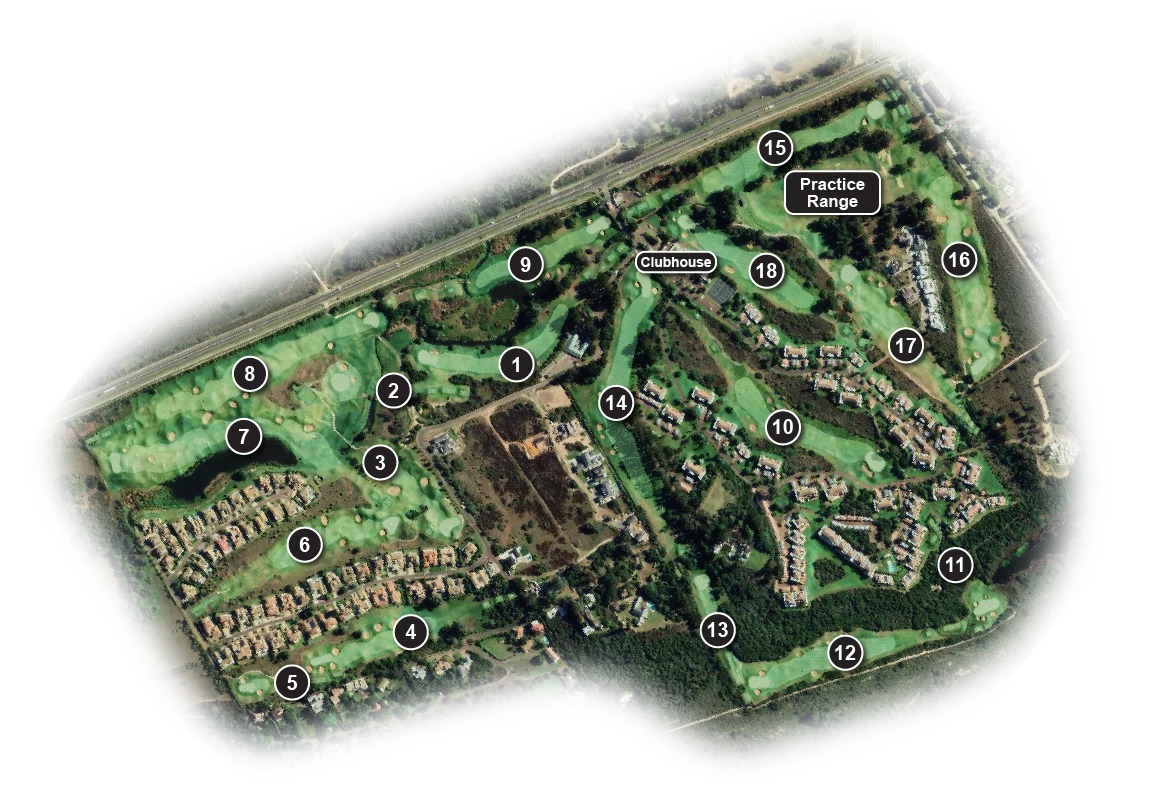
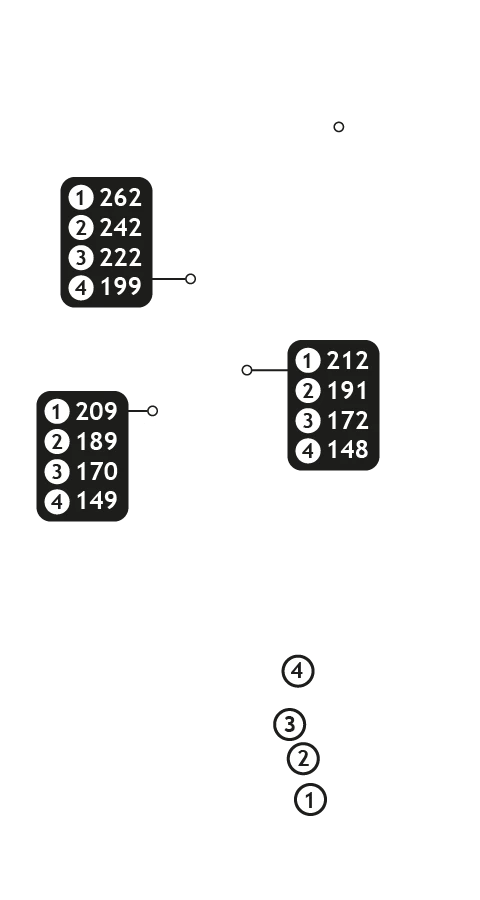
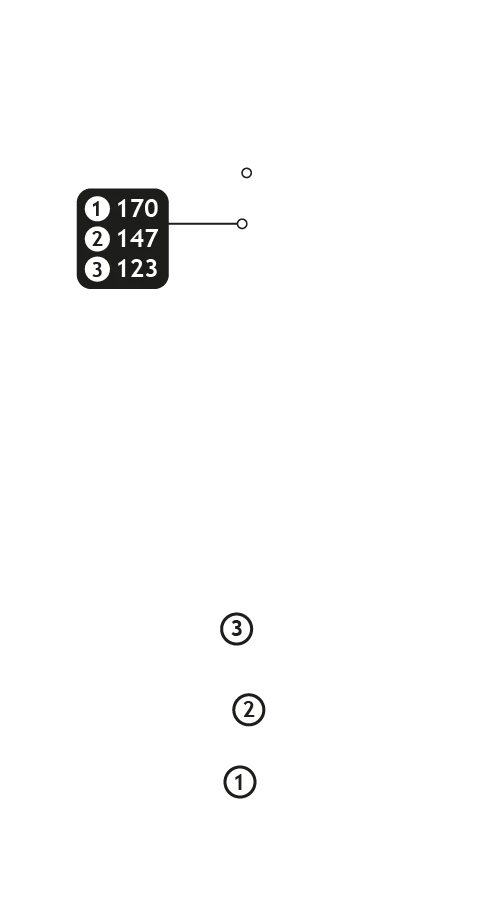
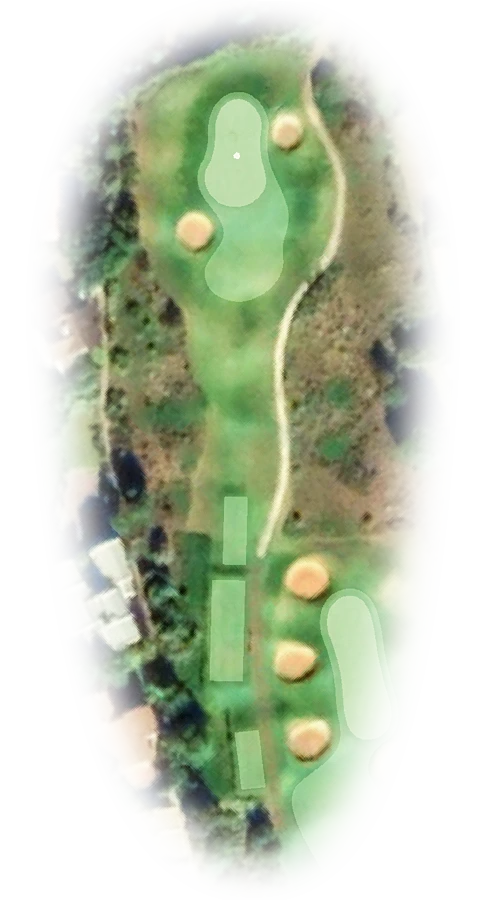
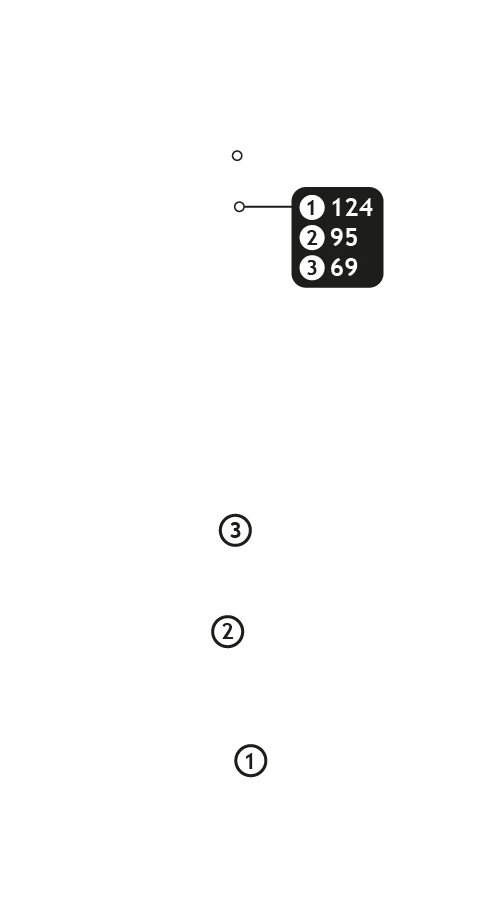
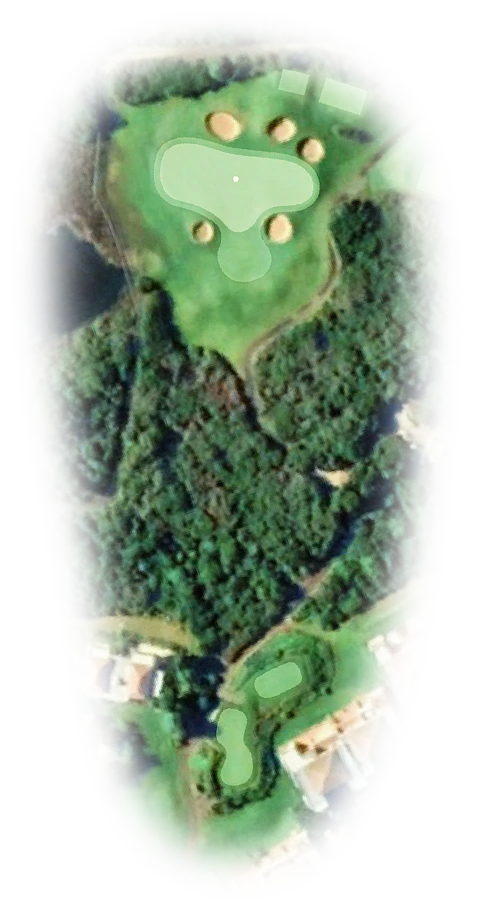
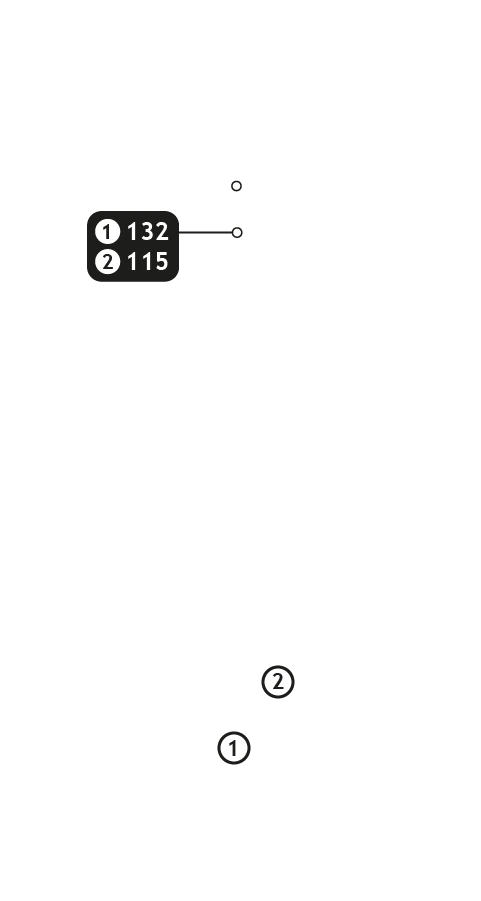
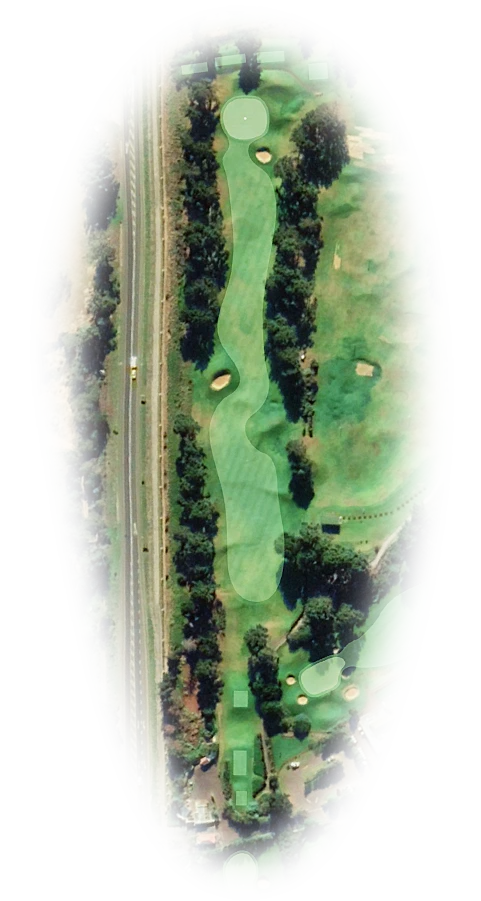
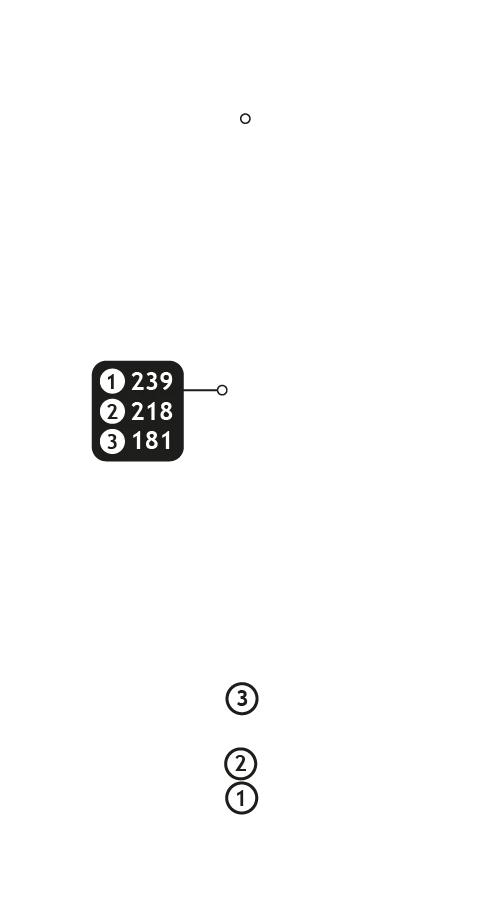
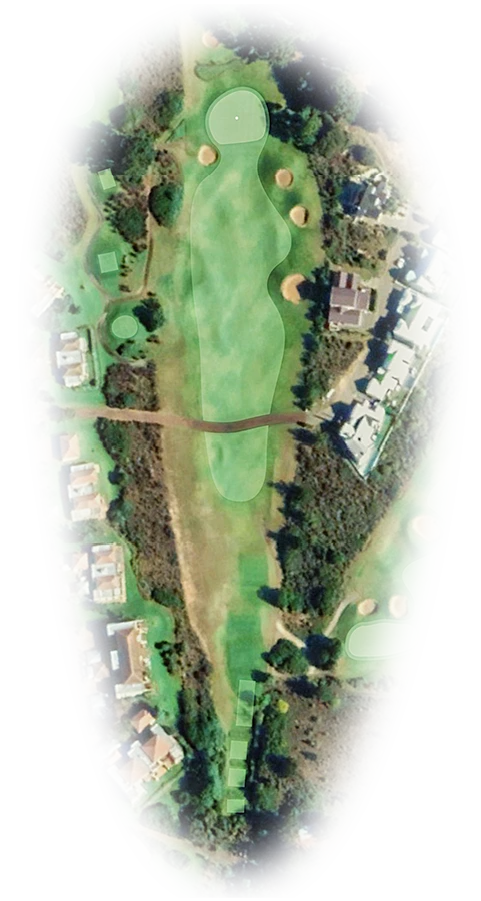
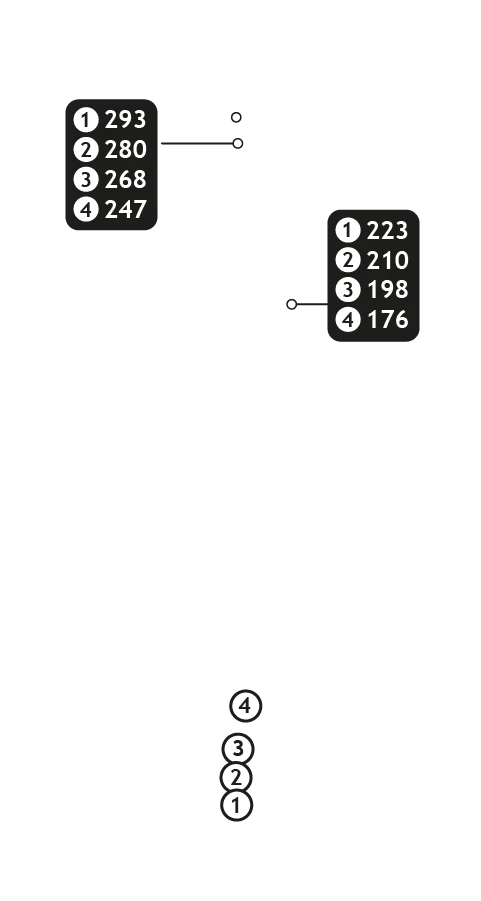
Buttons toggle between distance guide and media. See hole layout for result. If available, click orange icons to view media. All distances measured in meters from middle of Tee.
A very difficult starting hole that calls for a fade off the tee. Rated as a stroke 3 and plays as such. Stay on the fairway off the tee and the hole becomes much easier. A back flag position looks inviting, but a middle green shot is the smart play.

2 |
|
|||||||||
|
|
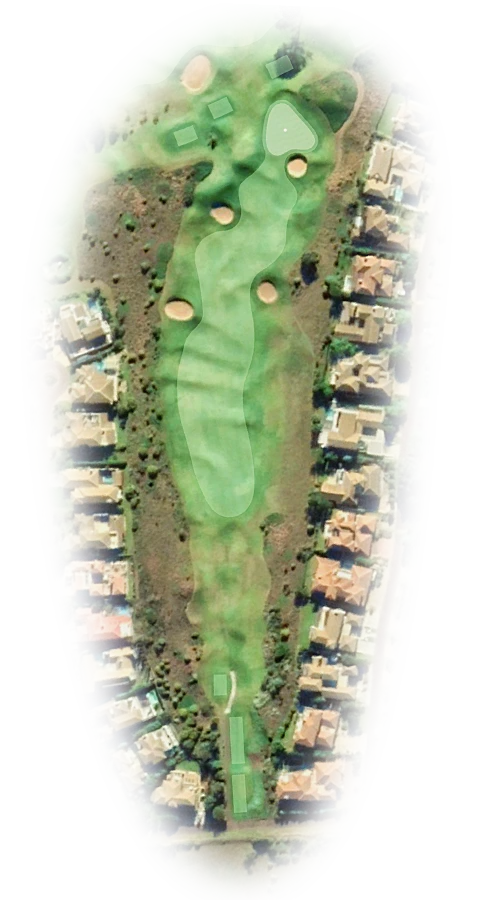
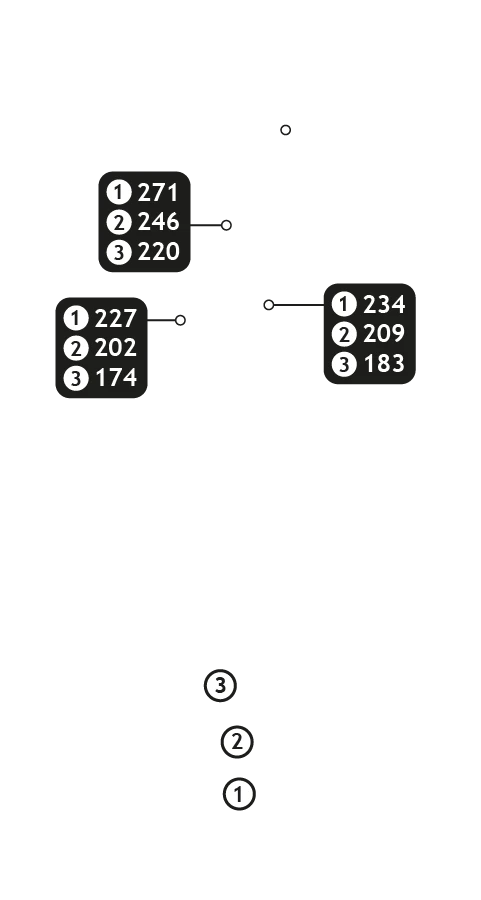
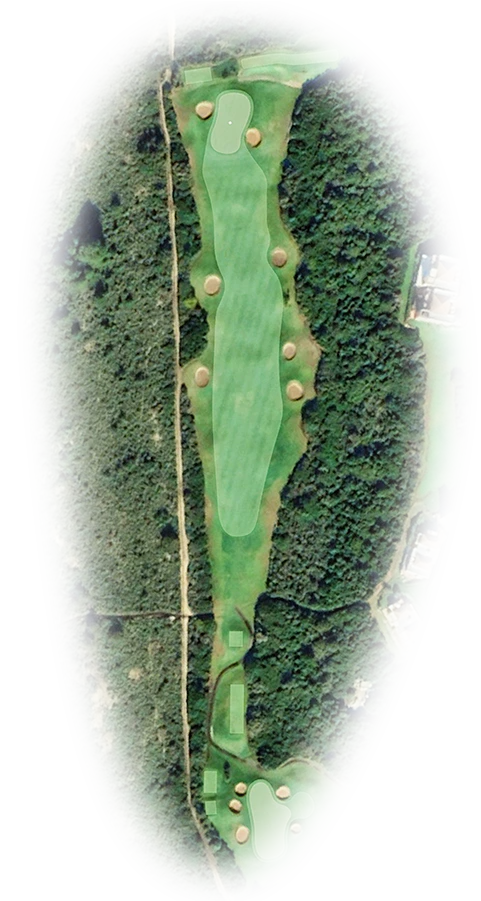
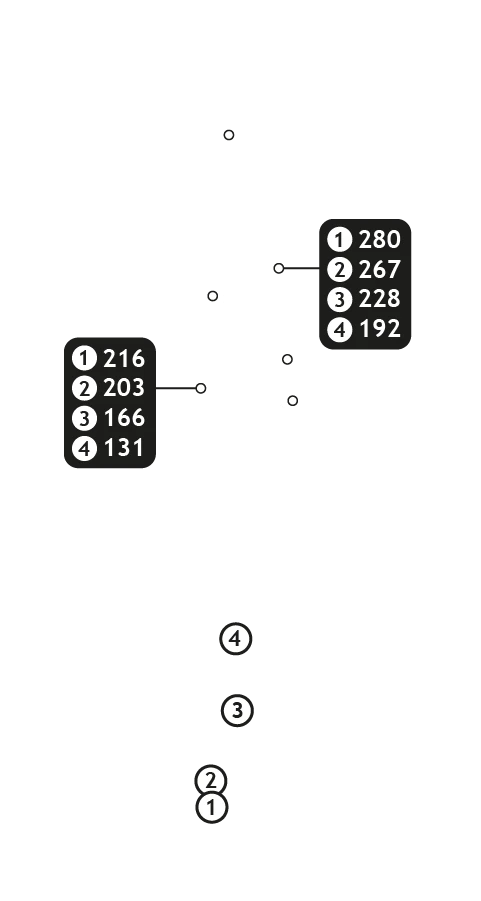
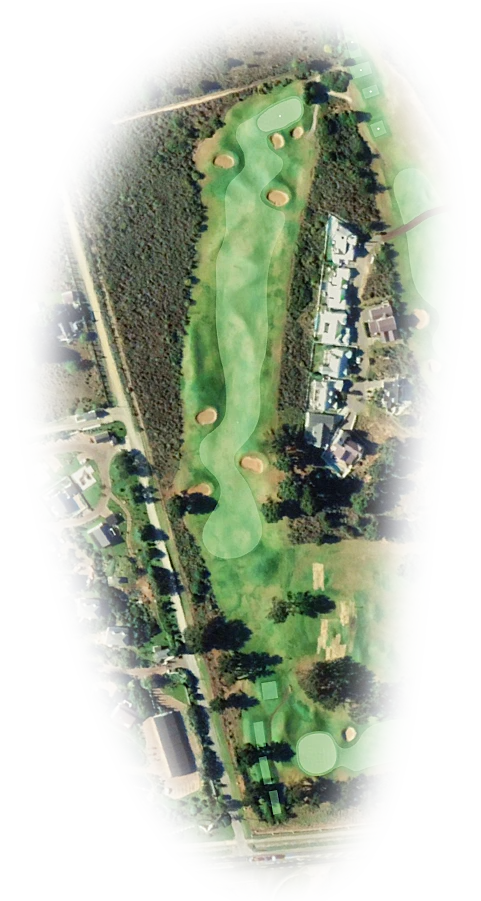
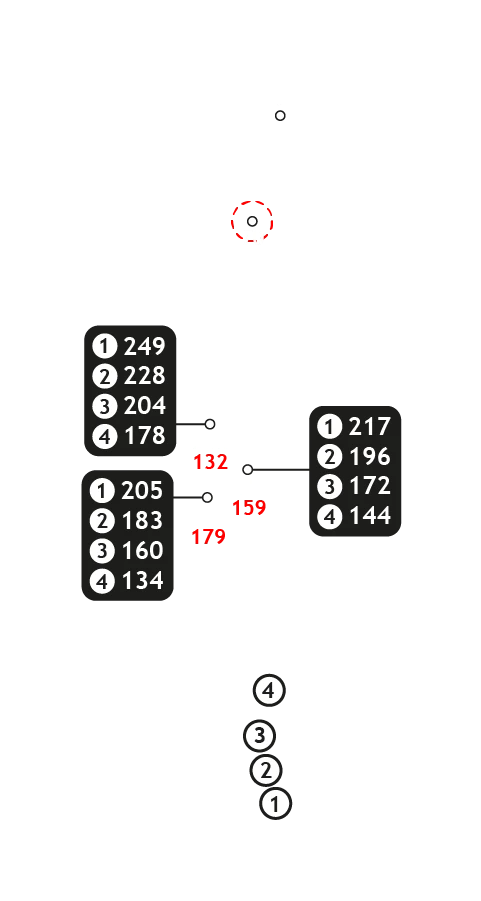
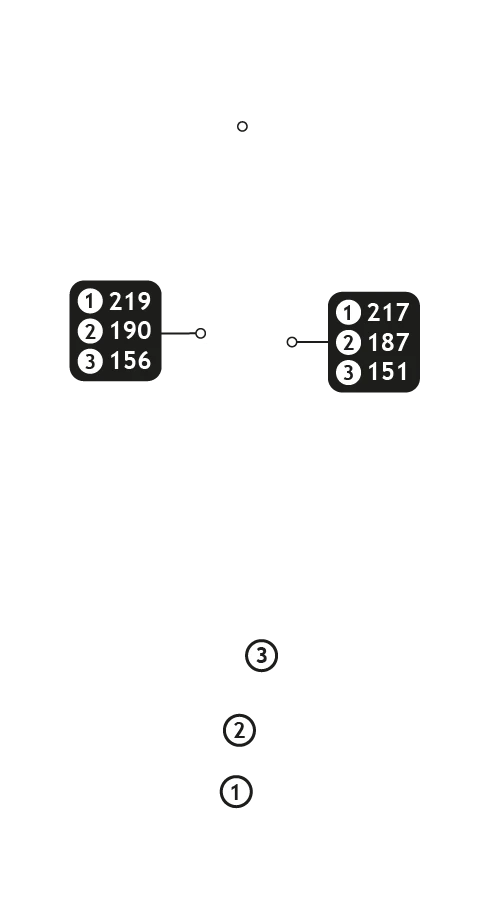
Buttons toggle between distance guide and media. See hole layout for result. If available, click orange icons to view media. All distances measured in meters from middle of Tee.
One of the tougher holes for the short hitter as it can play long and one of the bigger greens at Goose Valley but beware of deep bunkers short right, and long left calls for a tricky up and down. Short left is a good miss which sets up an easy up and down.
3 |
|
|||||||||
|
|
Buttons toggle between distance guide and media. See hole layout for result. If available, click orange icons to view media. All distances measured in meters from middle of Tee.
A shorter, easier par 4, however players can make a big number if they’re not careful. Well placed fairway bunkers need to be avoided off the tee. Keep left as the right side of the fairway leaves the player blocked by a big pine tree short right of the green. Stay short as there is a big run-off area on the back right side of the green.
4 |
|
|||||||||
|
|
Buttons toggle between distance guide and media. See hole layout for result. If available, click orange icons to view media. All distances measured in meters from middle of Tee.
A frightening tee shot with out of bounds right and fynbos tight left of the fairway. A sleeve pole indicates the line of the middle of the fairway however there is much more space on the right side guarded by 3 fairway bunkers. Shorter hitters might struggle to get to the top of the hill off the tee which leaves a very long and daunting shot onto a very narrow green. Favour the right side on this hole all the way to the green.
5 |
|
|||||||||
|
|
Buttons toggle between distance guide and media. See hole layout for result. If available, click orange icons to view media. All distances measured in meters from middle of Tee.
Off the middle tee this may look like an easy hole due to the length however holding this green proves to be very tough. Any drawn shot will struggle to stay up as the green deceivingly slopes to the left to a sunken valley, which leaves a very tricky up and down.
6 |
|
|||||||||
|
|
Buttons toggle between distance guide and media. See hole layout for result. If available, click orange icons to view media. All distances measured in meters from middle of Tee.
Pretty straightforward par 4. Players just need to avoid the fairway bunkers off the tee and a shortish shot will be left in. However, a short right shot to the green will be swallowed by a deep pot bunker.
7 |
|
|||||||||
|
|
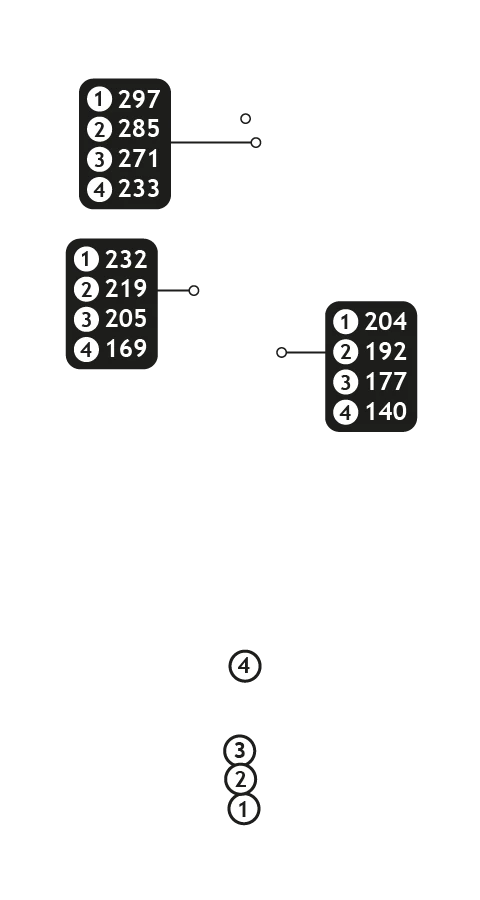
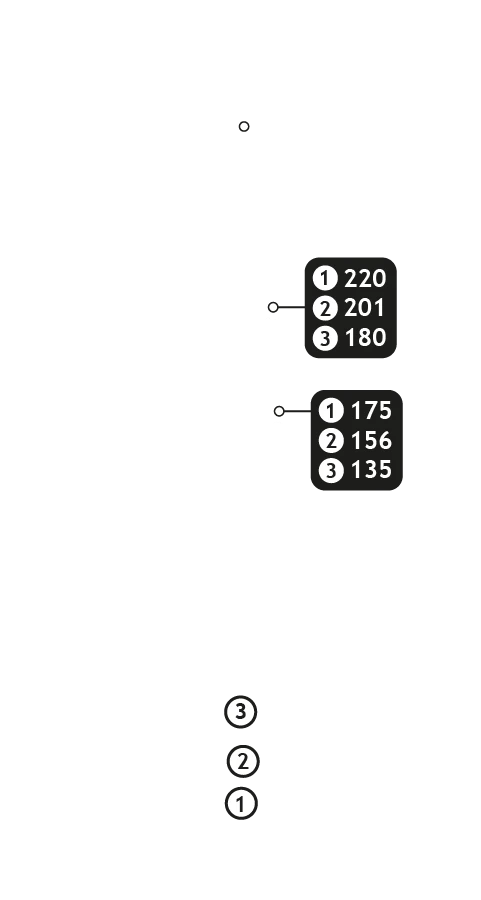
Buttons toggle between distance guide and media. See hole layout for result. If available, click orange icons to view media. All distances measured in meters from middle of Tee.
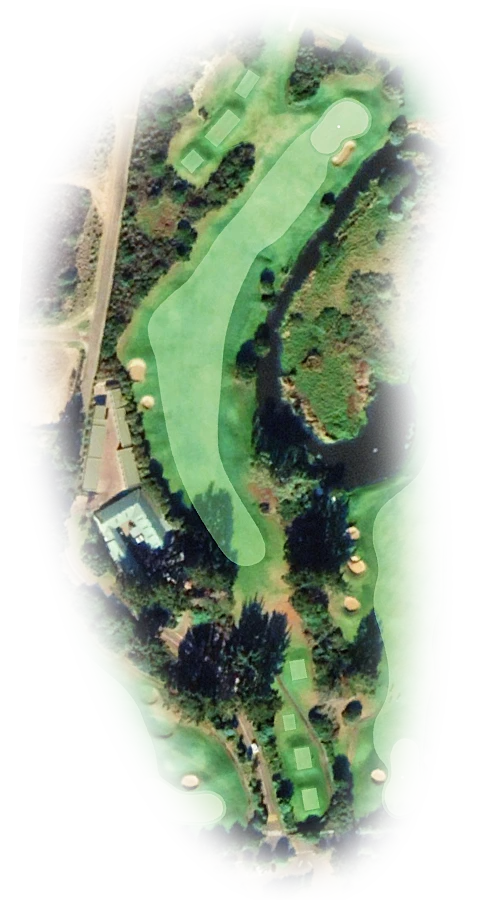
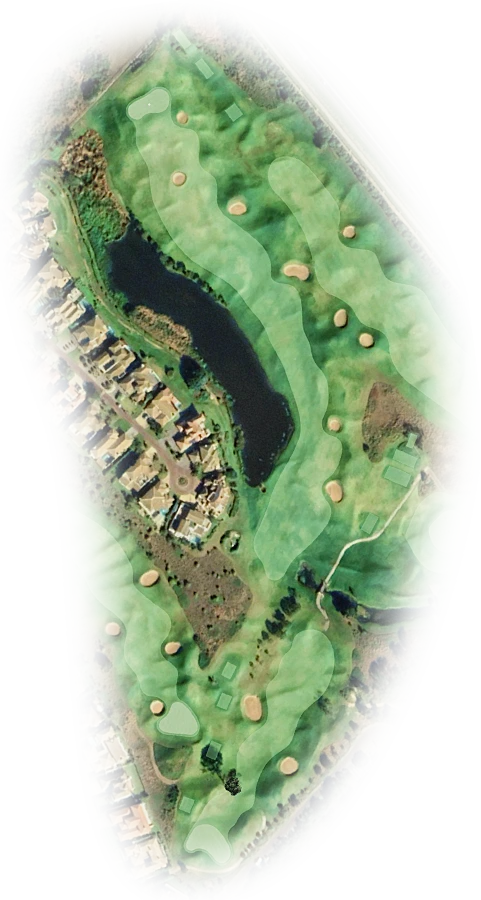
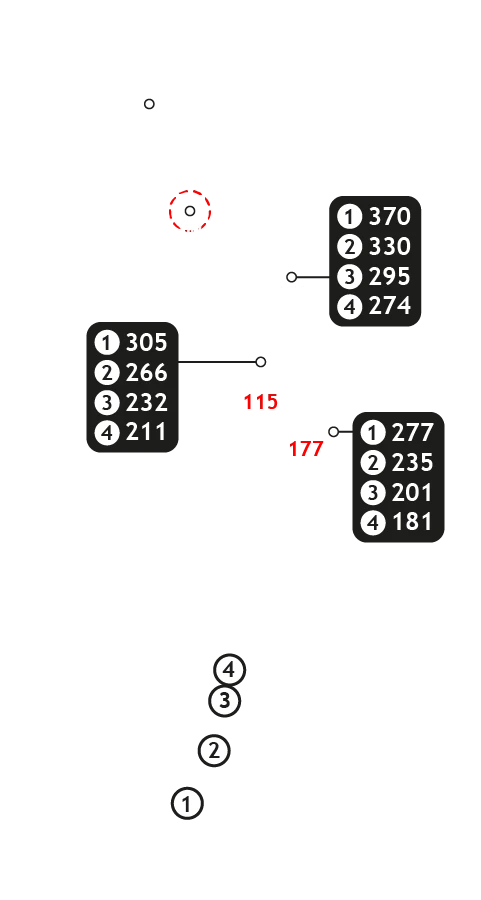
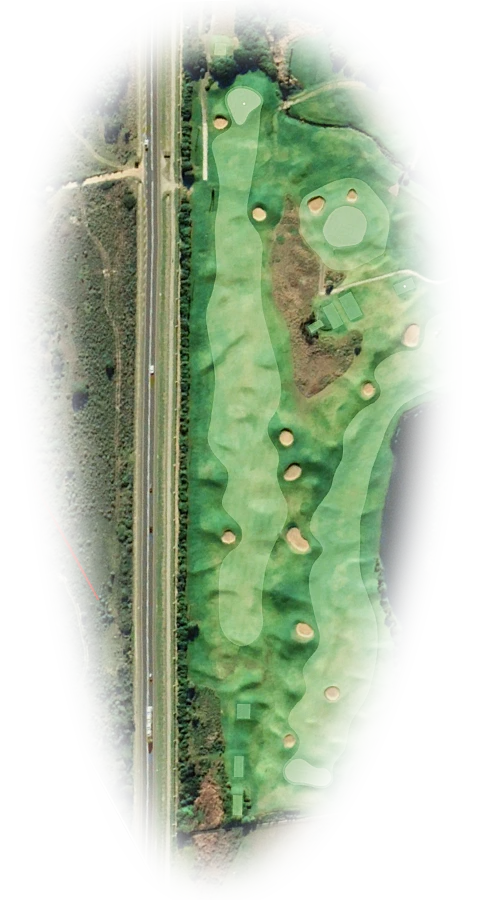
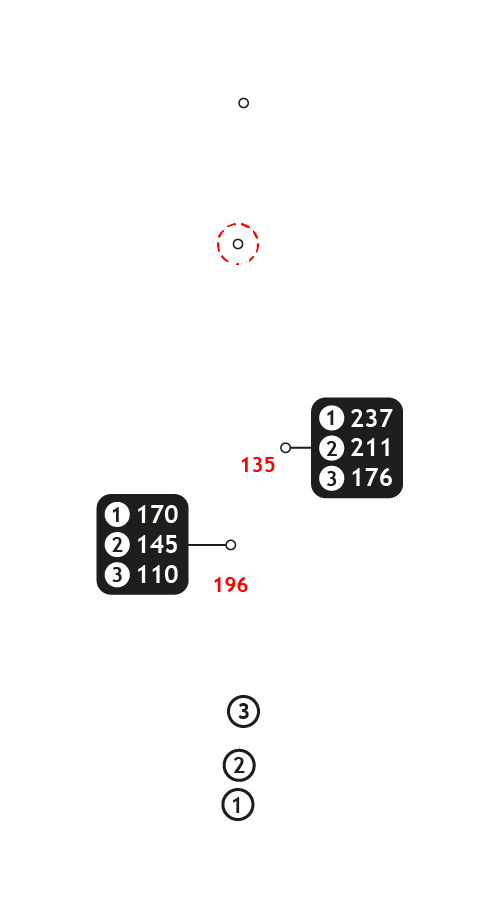
Unusual to have a par 5 as a stroke 1, but this par 5 definitely lives up to its rating. Although on the card the distance does not look exceedingly long, this hole plays uphill all the way and most days into the wind. A good tee shot is crucial with water all the way up the left and bunkers right. Always club up at least one club when hitting into the green as it plays further than it looks. Very narrow green (front to back) so club selection hitting into the green is important.
8 |
|
|||||||||
|
|
Buttons toggle between distance guide and media. See hole layout for result. If available, click orange icons to view media. All distances measured in meters from middle of Tee.
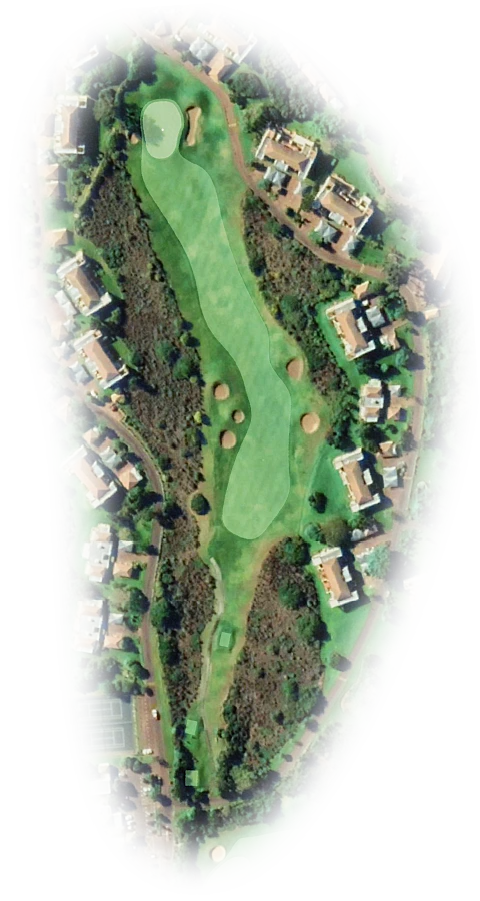
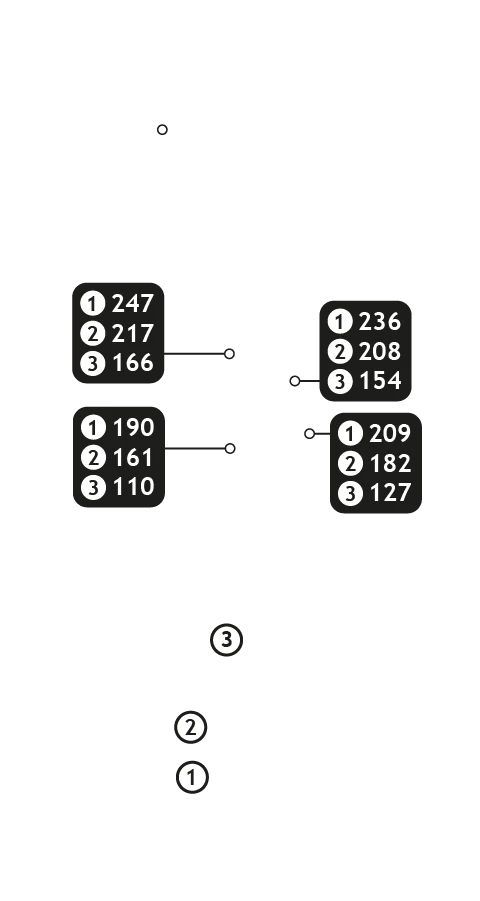
Definitely a scoring hole if the fairway is found off the tee. Plays downhill all the way to the green and very gettable in 2 for the long hitter. Beware of missing the green to the right as you may be faced with a tricky lie.
9 |
|
|||||||||
|
|
Buttons toggle between distance guide and media. See hole layout for result. If available, click orange icons to view media. All distances measured in meters from middle of Tee.
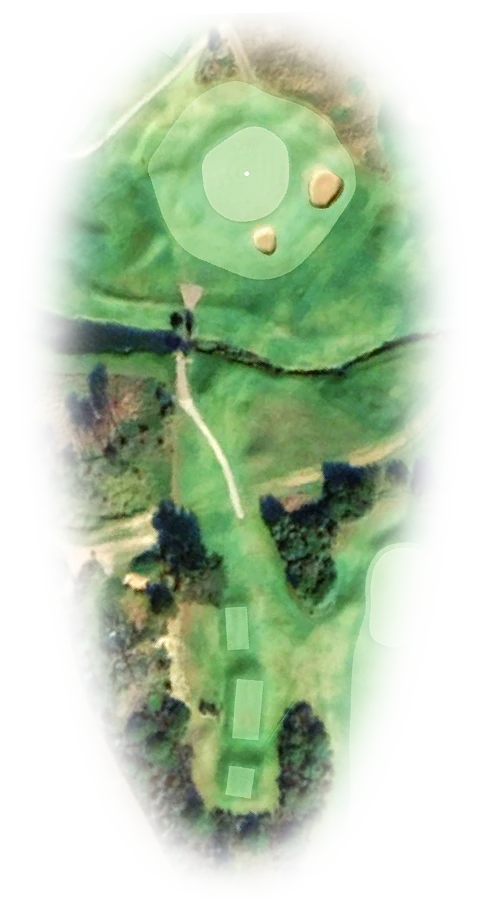
What you see is what you get. The trick on this hole is getting the ball on the right tier on the green. A 3-tier green makes putting the challenge on this hole so good distance control is required for the 2nd shot.
10 |
|
|||||||||
|
|
Buttons toggle between distance guide and media. See hole layout for result. If available, click orange icons to view media. All distances measured in meters from middle of Tee.
After a halfway stop this brute poses a tough challenge off the back tees. It is a very long hole with fynbos on both sides and many fairway bunkers guarding the corner for players trying to take a tight line. Even off a great drive you will still be faced with a long iron/wood to the green. This tee shot calls for a draw shape; players who hit a cut could face more than 200m in.
11 |
|
|||||||||
|
|
Buttons toggle between distance guide and media. See hole layout for result. If available, click orange icons to view media. All distances measured in meters from middle of Tee.
Goose Valley’s signature hole is a beautiful sight from the top tee, overlooking the Keurbooms lagoon and Indian ocean beyond the green. The tee shot is not easy as the wind tends to swirl making club choice difficult. Also, a very wide green with multiple pin position options, some very challenging pins on the left and right. Over this green is an absolute no-no, players going long will be sure to drop a shot.
12 |
|
|||||||||
|
|
Buttons toggle between distance guide and media. See hole layout for result. If available, click orange icons to view media. All distances measured in meters from middle of Tee.
This hole can be quite easy, but also has the set up to quickly ruin a scorecard. With fynbos tightly hugging the fairway left and right and strategically placed bunkers, an accurate tee shot is vital. There is a huge slope in the green from back to front making front and middle pin locations easily accessible, however a back flag is a sucker pin position.
13 |
|
|||||||||
|
|
Buttons toggle between distance guide and media. See hole layout for result. If available, click orange icons to view media. All distances measured in meters from middle of Tee.
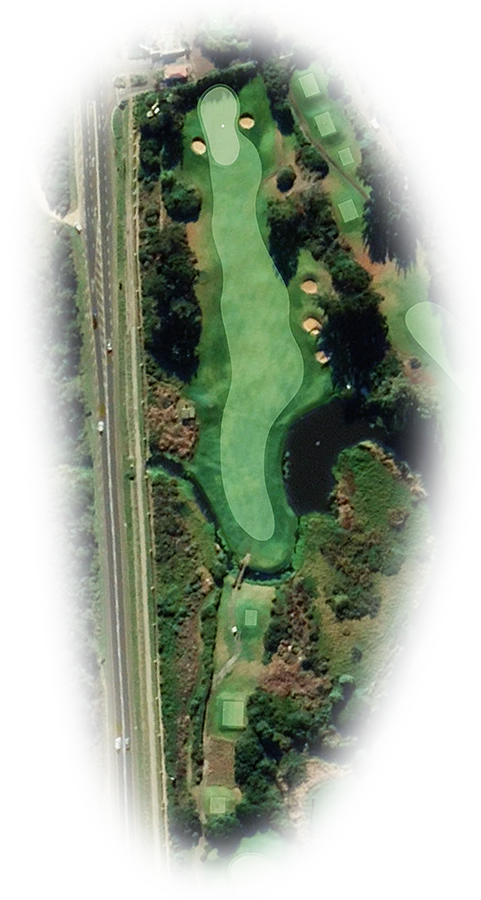
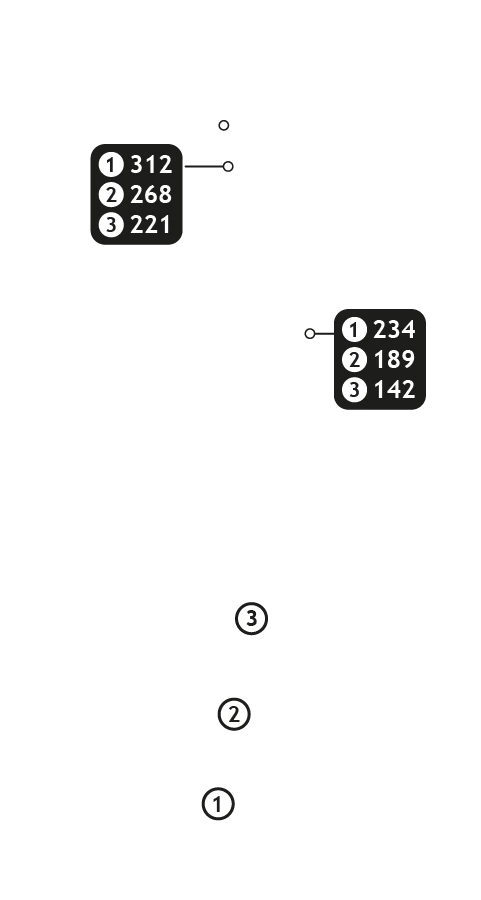
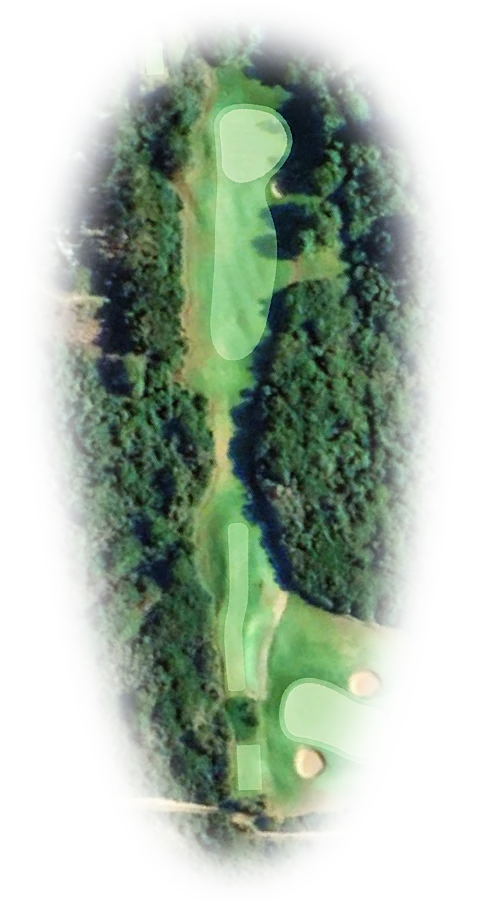
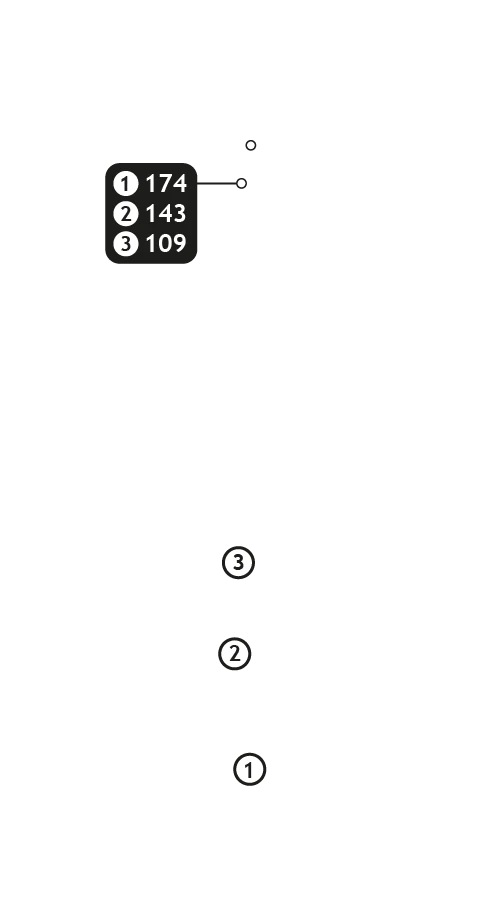
The last of the par 3’s but certainly not the least. A seemingly daunting tee shot as the fynbos lining both the left and right sides creates a narrow corridor up to an elevated green. From the championship tee box this almost becomes a tricky par 4. From the club tees players will be smiling walking off with a par 3.
14 |
|
|||||||||
|
|
Buttons toggle between distance guide and media. See hole layout for result. If available, click orange icons to view media. All distances measured in meters from middle of Tee.
Another stunning looking par 5 dogleg right to an awkwardly angled double tiered green. Out of bounds left and right and fairway bunkers left and a deep fairway bunker right with a ribbed vertical face. A misplaced tee shot will force players to chip out sideways back into play. Long hitters can reach in two with 2 perfectly struck shots, however 3 strategically placed shots will afford more consistent results.
15 |
|
|||||||||
|
|
Buttons toggle between distance guide and media. See hole layout for result. If available, click orange icons to view media. All distances measured in meters from middle of Tee.
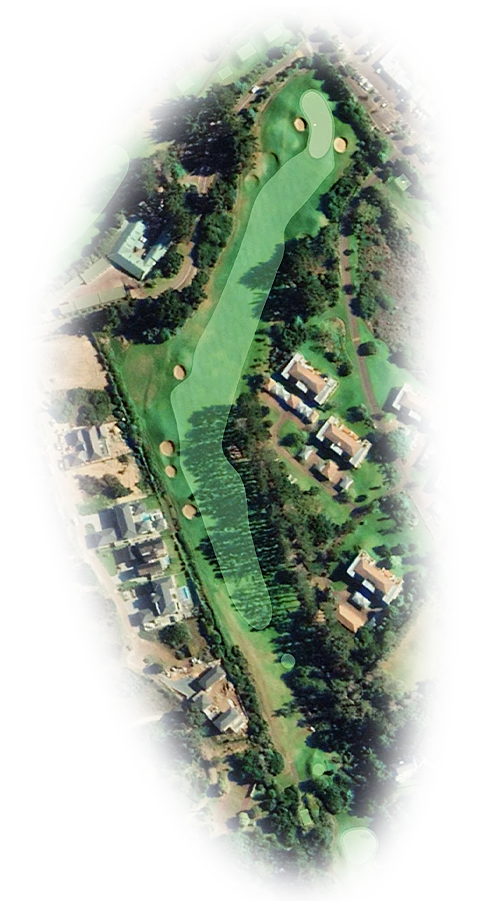
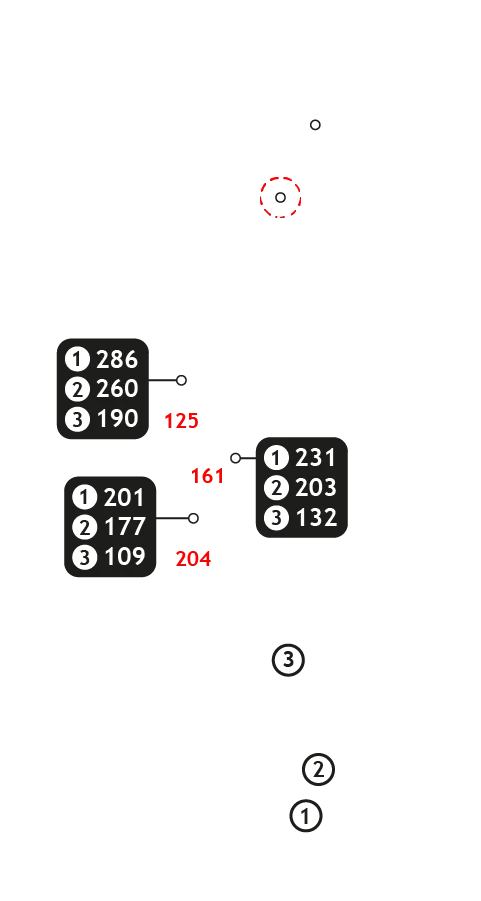
Par 4 stroke 2 that can easily mess up a good card. A well-placed tree overhanging the right side of the fairway forces a player to start the ball up the left side, a player with a draw shape will struggle to find the fairway off the tee. The better play would be shorter club off the tee landing short of the fairway bunker leaving a longer shot in for two. Longer hitters taking on the bunker must find a very narrow fairway and could possibly be blocked out by the trees both left and right. Again, short is a good miss on this very tough par 4.
16 |
|
|||||||||
|
|
Buttons toggle between distance guide and media. See hole layout for result. If available, click orange icons to view media. All distances measured in meters from middle of Tee.
One of the longer par 5’s on the course that requires a bit of thinking. Well placed bunkers left and right ready to swallow a slightly offline tee shot. What makes this hole tricky is a very narrow (front to back) highly elevated green with deep bunkers guarding the front side.
17 |
|
|||||||||
|
|
Buttons toggle between distance guide and media. See hole layout for result. If available, click orange icons to view media. All distances measured in meters from middle of Tee.
Stroke 18 a scoring hole. Long hitters will be tempted to take on the green in one shot. However, the better play will be to lay up and leave a fuller shot in.
18 |
|
|||||||||
|
|
Buttons toggle between distance guide and media. See hole layout for result. If available, click orange icons to view media. All distances measured in meters from middle of Tee.
Beautiful little finishing hole, tough tee shot from the back tees as players won’t be able to see much of the hole, although there is much more space than meets the eye. A lot of pressure as the rest of the hole is played in front of the clubhouse. Just find the fairway from the tee and the second shot becomes much easier.