1 |
|
|||||||||
|
|
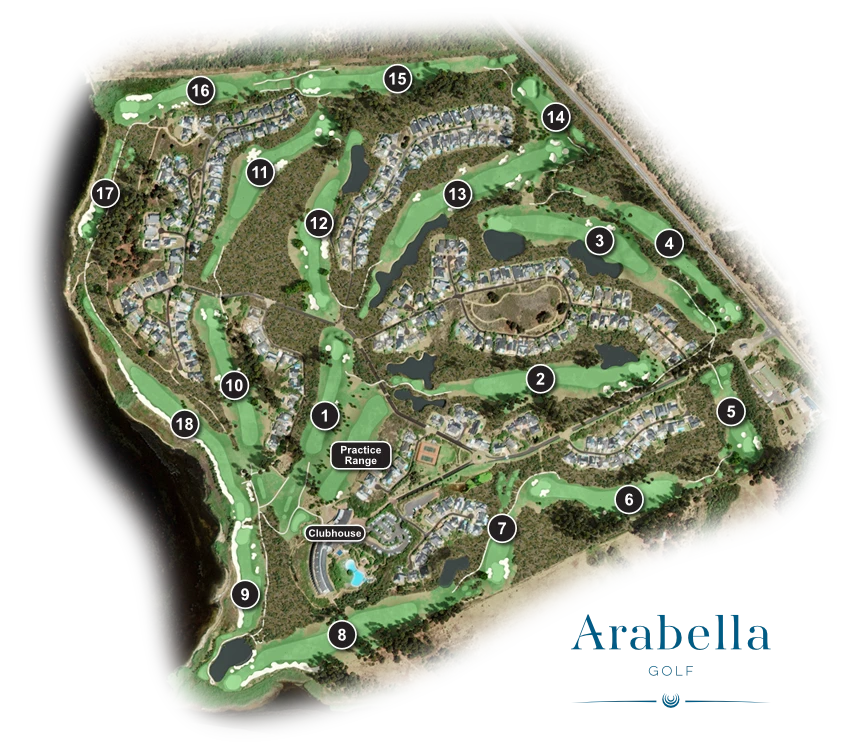
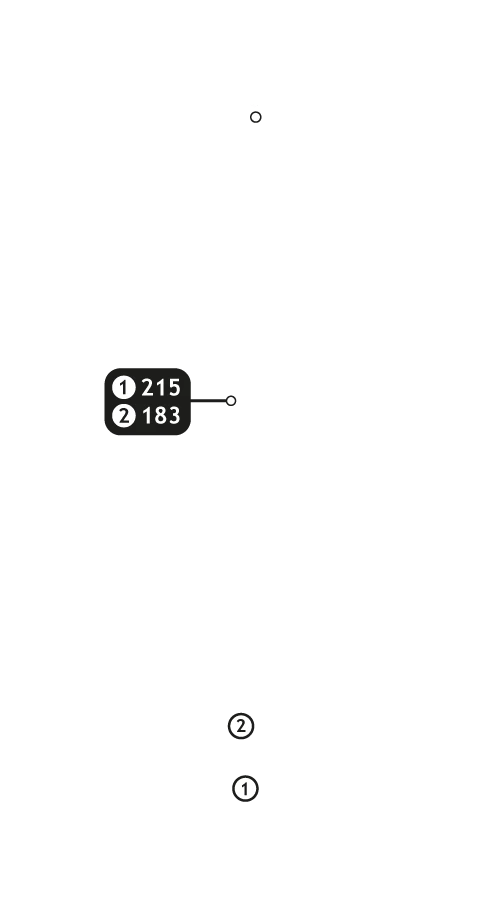
Buttons toggle between distance guide and media. See hole layout for result. If available, click icons to view media.
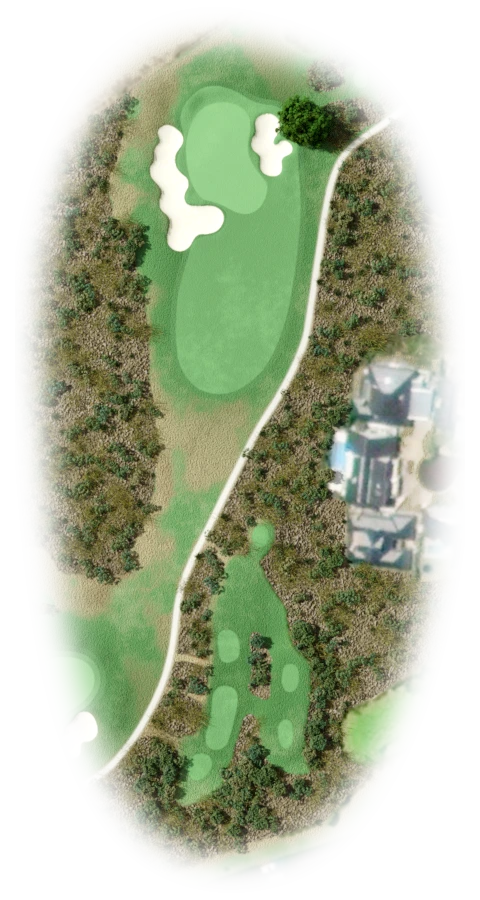
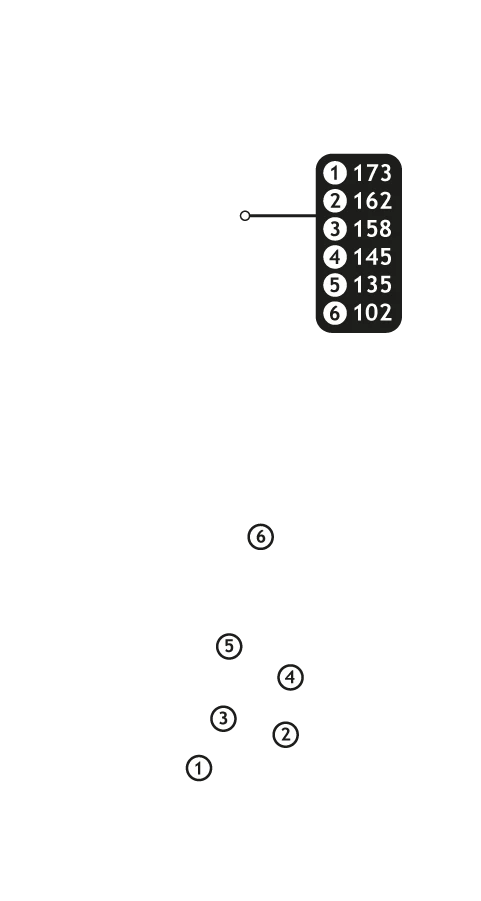
A friendly uphill start, if you err make sure it's right. A quick green with deceptive breaks.

2 |
|
|||||||||
|
|
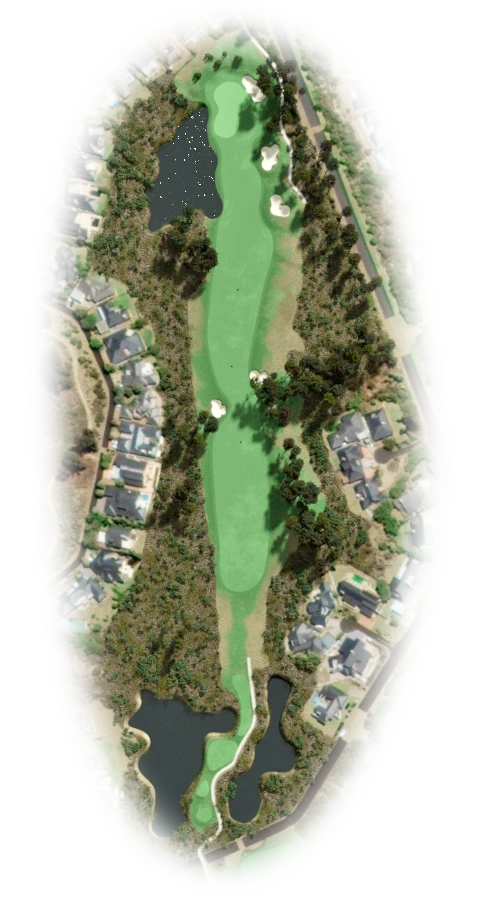
Buttons toggle between distance guide and media. See hole layout for result. If available, click icons to view media.
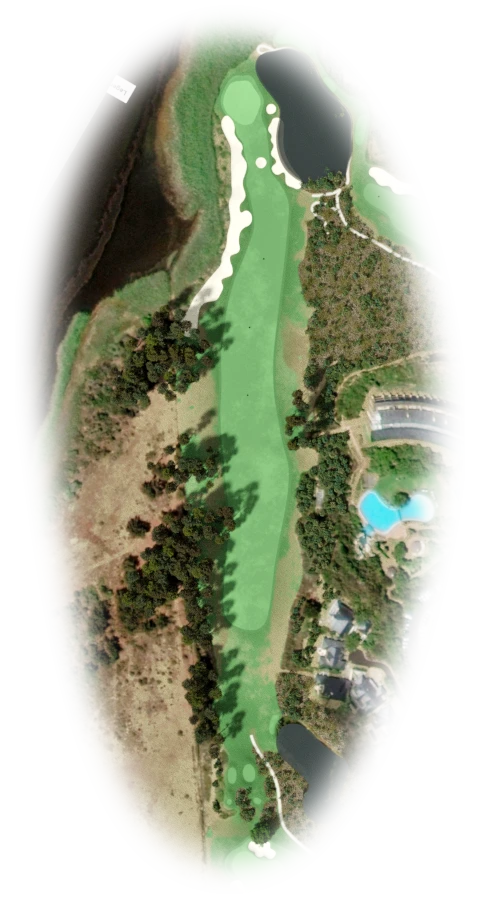
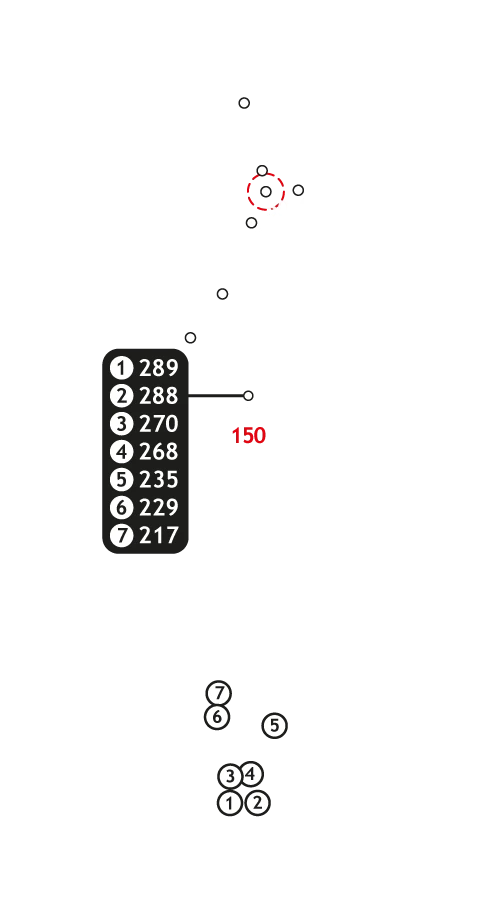
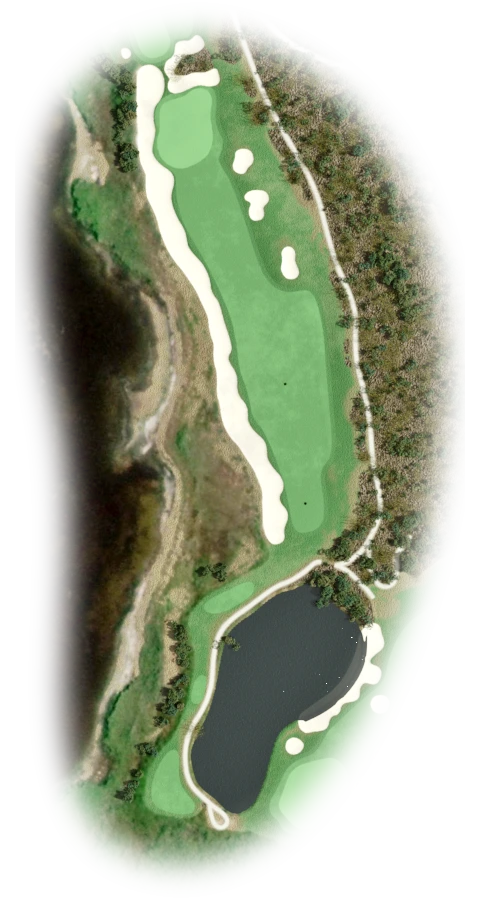
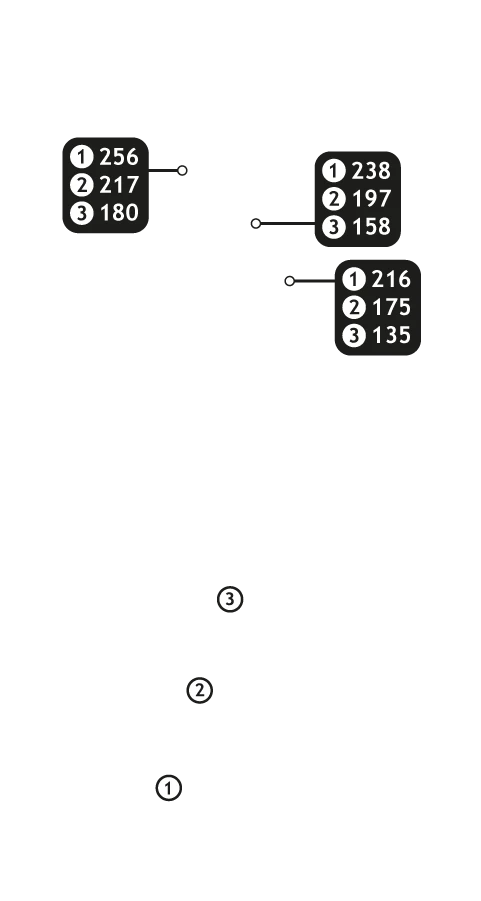
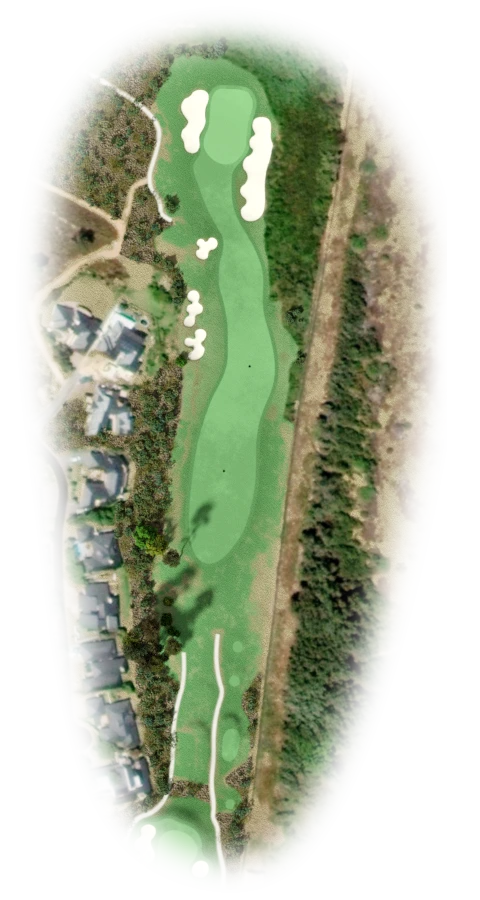
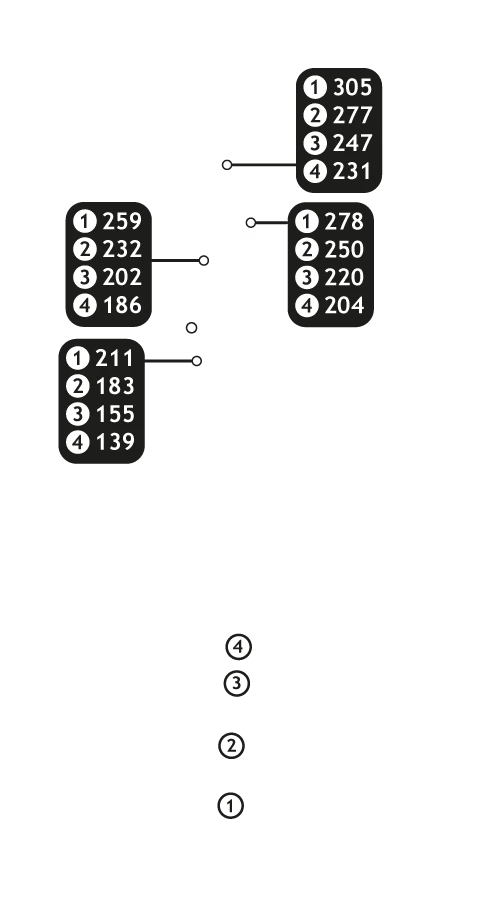
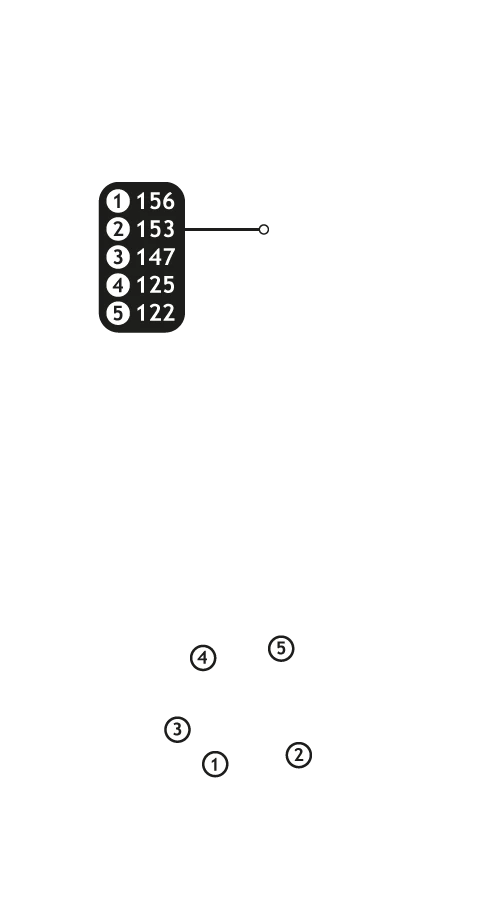
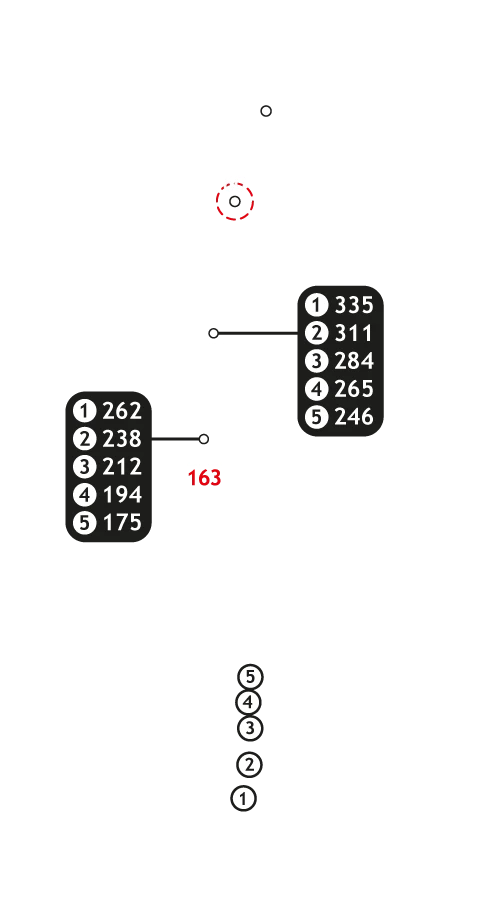
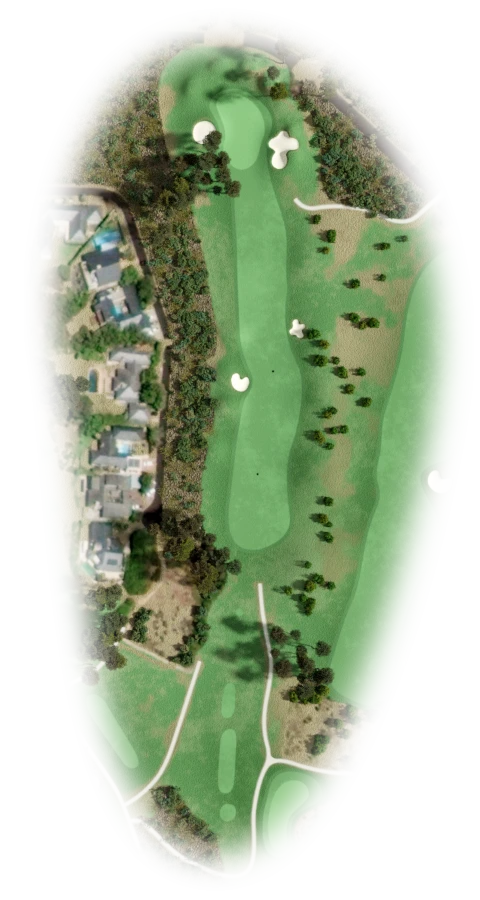
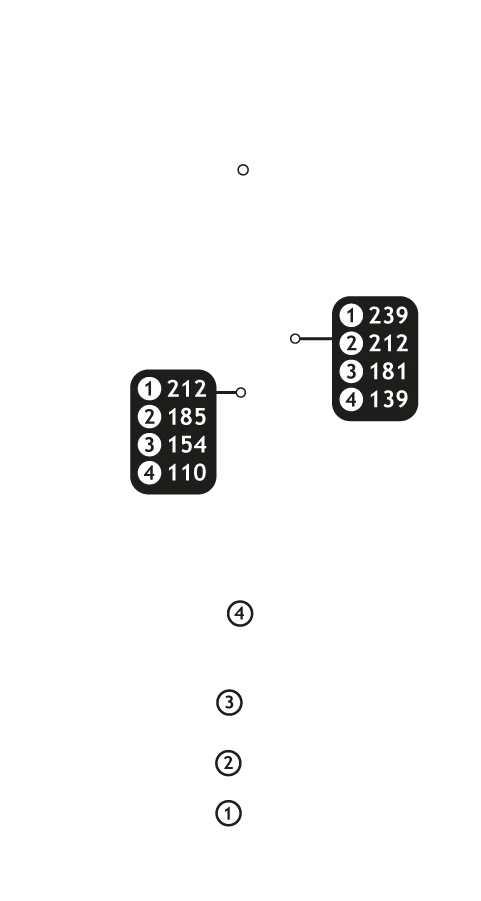
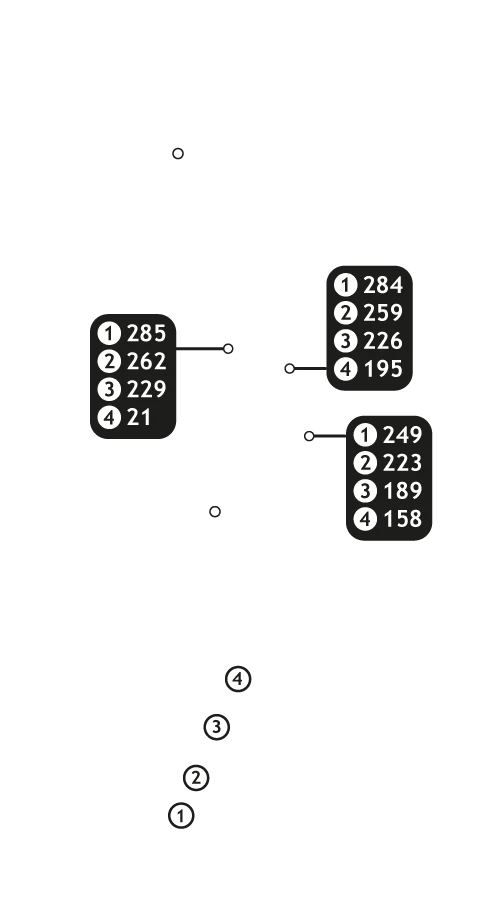
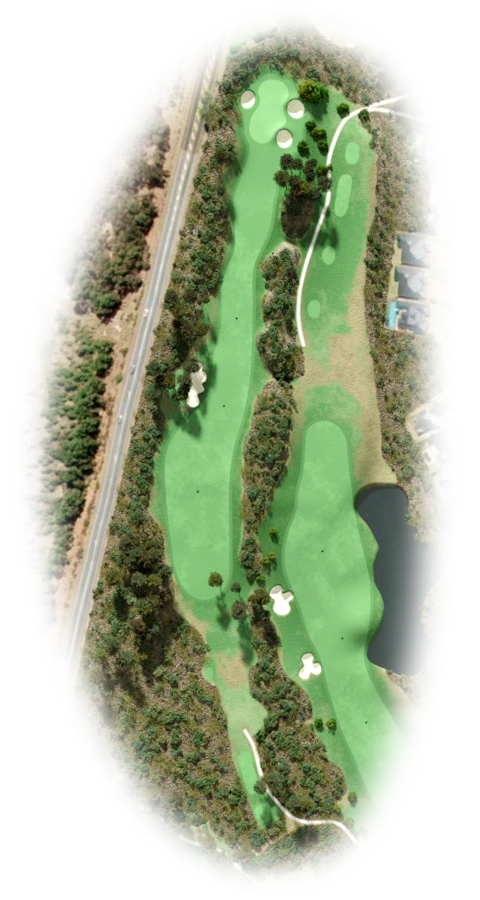
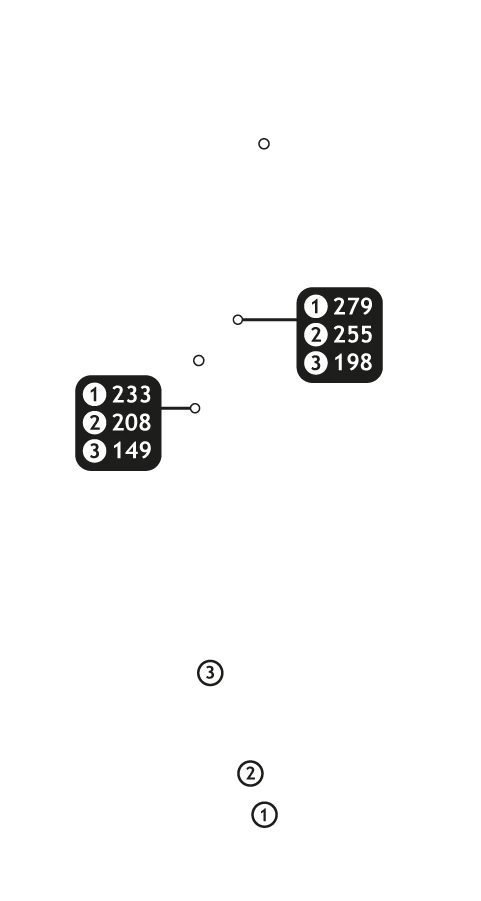
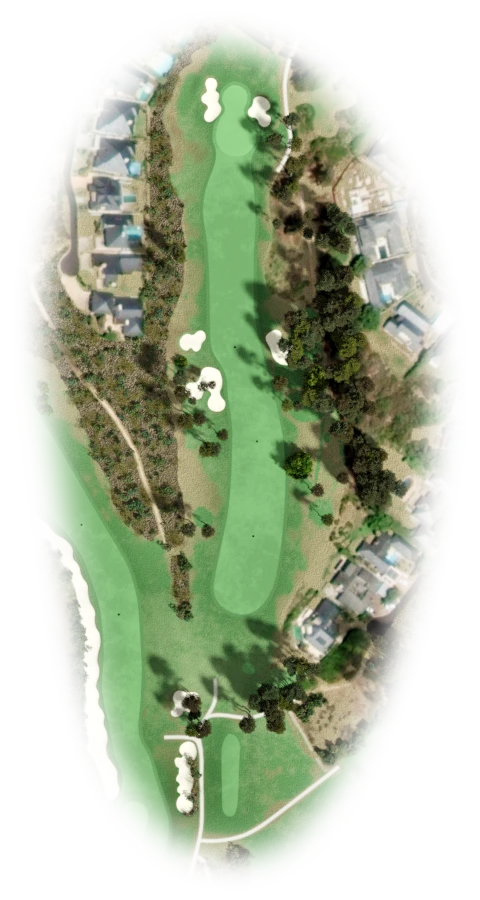
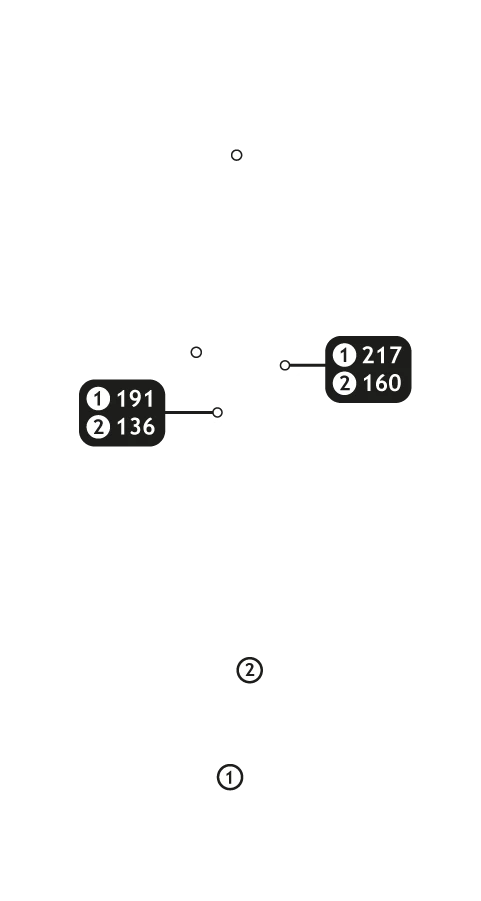
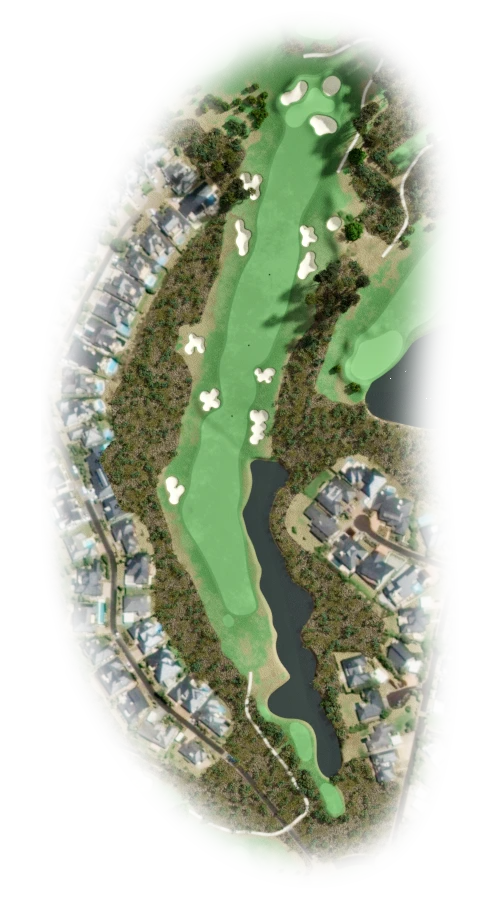
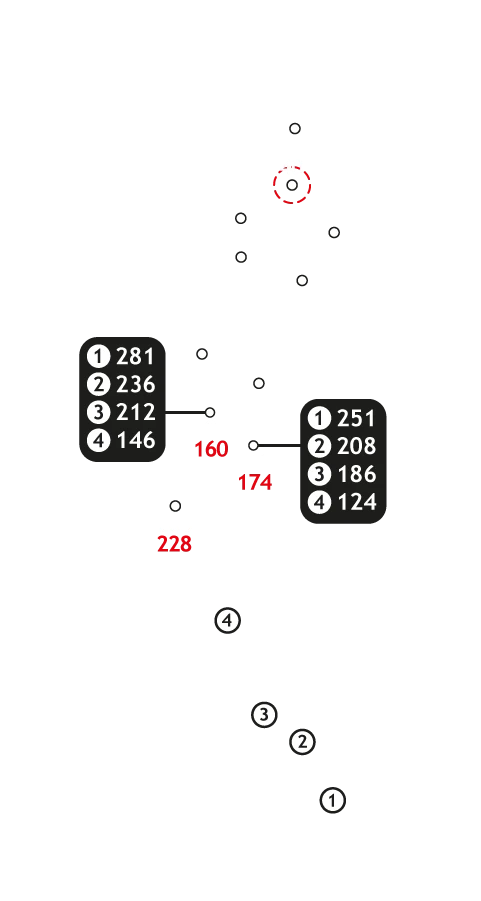
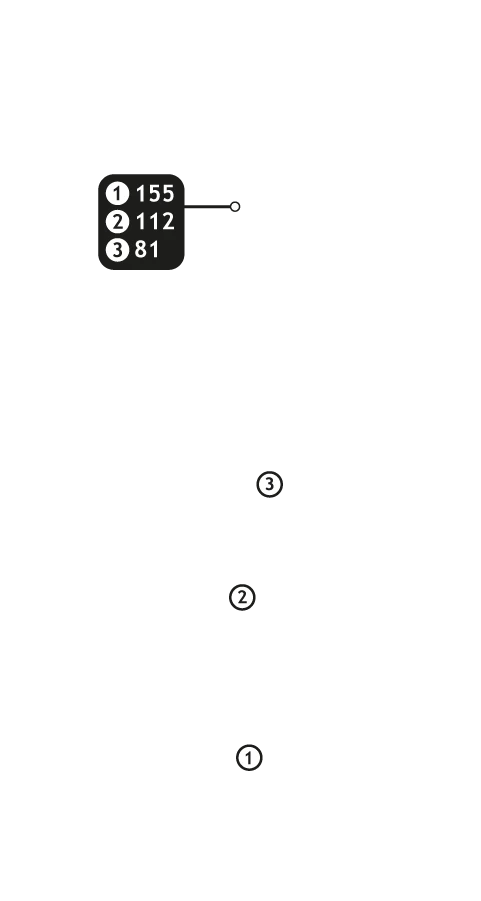
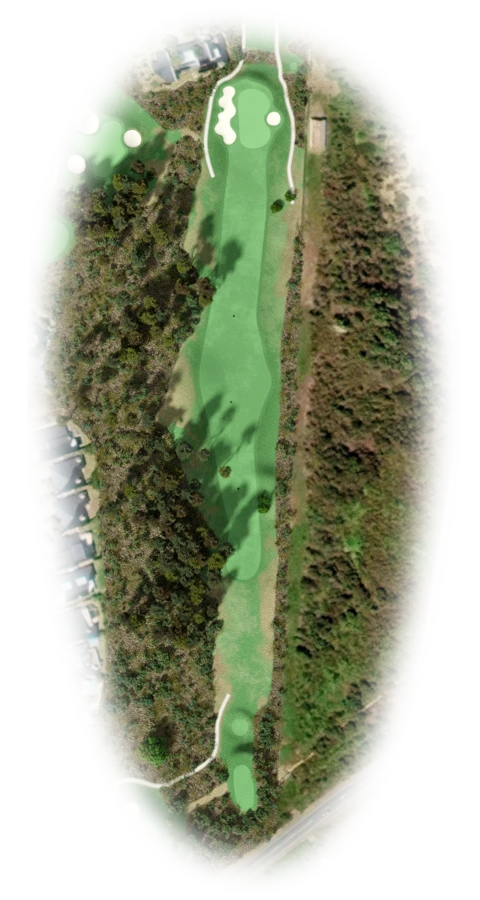
Ensure you get off the tee safely and then decide to go for the green on this reachable par 5 or play safe to give yourself a simple shot in that takes greenside water out of play. If you lay up, make sure to lay up short of the Water and Bunkers.
3 |
|
|||||||||

|
|
Buttons toggle between distance guide and media. See hole layout for result. If available, click icons to view media.
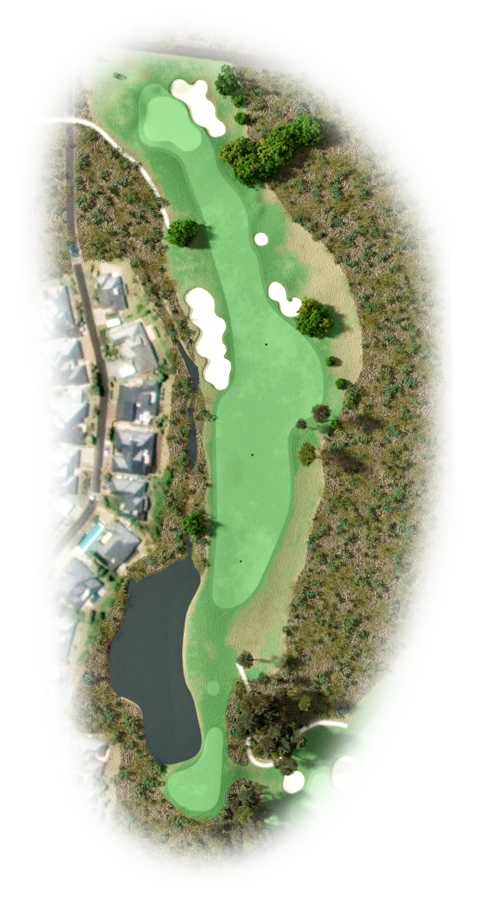
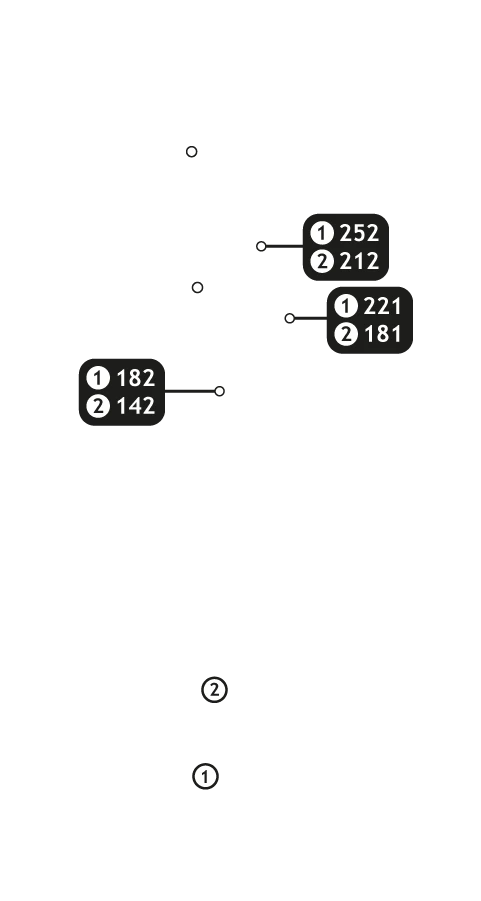
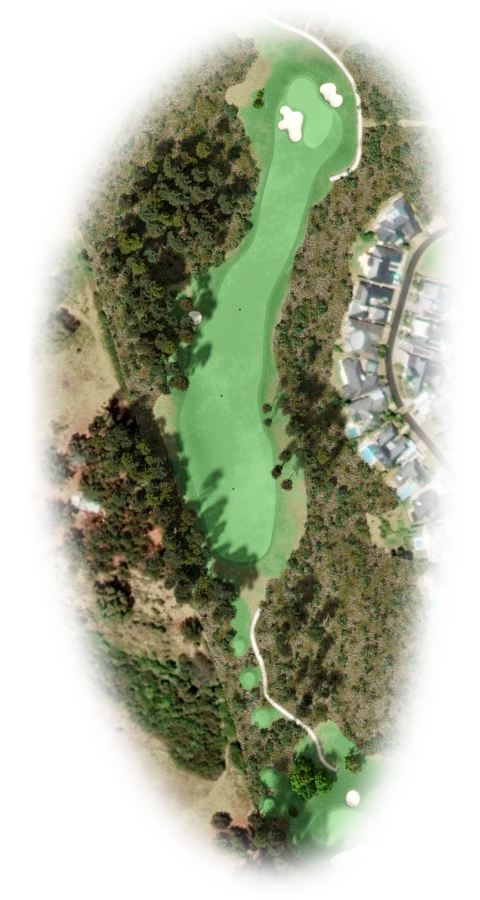
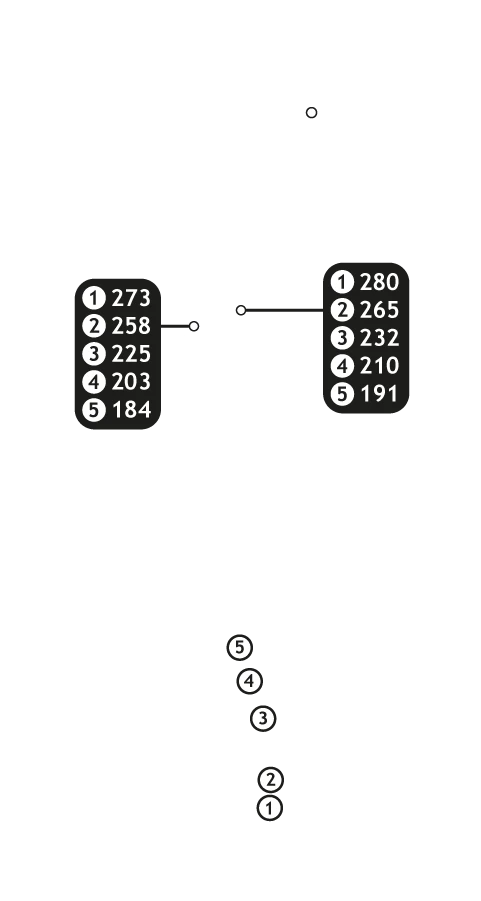
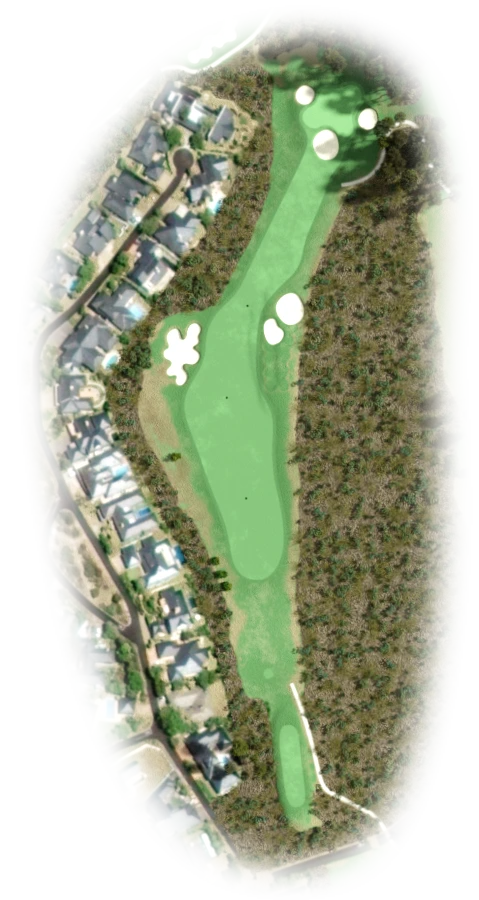
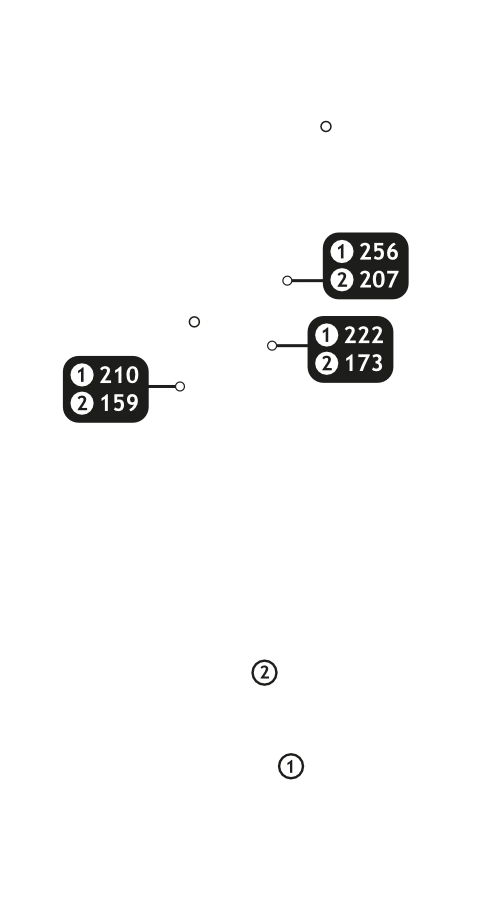
A monstrous par 4 that demands accuracy off the tee and a long 2nd. Make use of the bailout area right of the green if you are prone to over drawing long irons.
4 |
|
|||||||||
|
|
Buttons toggle between distance guide and media. See hole layout for result. If available, click icons to view media.
Position is key, driver may not be the best option unless you can hit a perfect cut off the fairway bunker, favor the right side of the fairway to allow for a view of the green for a critical 2nd shot. With the ball below your feet favour the right as left of the green is dead.
5 |
|
|||||||||
|
|
Buttons toggle between distance guide and media. See hole layout for result. If available, click icons to view media.
The ball will travel longer in the air because of the downhill, club selection is key. The green slopes strongly to the right and anything left of the green will be difficult to stop coming back down to the flag.
6 |
|
|||||||||
|
|
Buttons toggle between distance guide and media. See hole layout for result. If available, click icons to view media.
Right of the fairway bunker is your target, but not too far right, a sharp uphill dogleg makes for a tricky 2nd into a narrow undulated green which is slow uphill but super slick down the slope. Take more club on the approach. Uphill into the grain results in no roll.
7 |
|
|||||||||
|
|
Buttons toggle between distance guide and media. See hole layout for result. If available, click icons to view media.
Aim for the middle of the green and 2 putt, left of center will be lost into the bunker. See if you can sneak it past the right lip of the front left bunker.
8 |
|
|||||||||
|
|
Buttons toggle between distance guide and media. See hole layout for result. If available, click icons to view media.
Take a moment to soak it all in and appreciate the start of one of SA's finest par 5's, listen and see if you can spot the fish eagle. Long hitters can risk a long narrow 2nd to the well-guarded green but the safe play is just short of the middle fairway pot bunker for 2, but then again you never came for a haircut, if you have a flat lie have a go! The wind is normally a lot stronger at the green and can't be felt in the fairway.
9 |
|
|||||||||
|
|
Buttons toggle between distance guide and media. See hole layout for result. If available, click icons to view media.
Hit your most trustworthy club at the middle bunker, alternatively take a risk and you may find yourself putting for eagle.
10 |
|
|||||||||
|
|
Buttons toggle between distance guide and media. See hole layout for result. If available, click icons to view media.
A big par 4 that is deceptively long, safety 1 st off the tee will force a long iron 2nd but wayward tee shots will be punished. Favour the left side of the fairway for a clear view of the green. A very quick downhill green with big breaks when putting diagonally.
11 |
|
|||||||||
|
|
Buttons toggle between distance guide and media. See hole layout for result. If available, click icons to view media.
Driver here is not the percentage shot, play safe and avoid the fairway bunkers and small landing zone. Hit it straight down the big chimney. Take an extra club to clear greenside pot bunker.
12 |
|
|||||||||
|
|
Buttons toggle between distance guide and media. See hole layout for result. If available, click icons to view media.
Take aim at the fairway bunkers rather than taking tiger line straight at green, aim for the middle of this elevated green or risk having your ball run back down the slope to the fairway or leak right into bunker. This green is firm because of the elevation.
13 |
|
|||||||||
|
|
Buttons toggle between distance guide and media. See hole layout for result. If available, click icons to view media.
Reachable par 5 for longer hitters prepared to take a line over the water off the tee. Layup left for a better angle into the green. A narrow diagonal green is protected by 3 greenside bunkers.
14 |
|
|||||||||

|
|
Buttons toggle between distance guide and media. See hole layout for result. If available, click icons to view media.
A deceptive short par 3 with an unseen valley in front of the green which gathers many flag hunters who misjudge the yardage. Take enough club to reach the middle of the green.
15 |
|
|||||||||
|
|
Buttons toggle between distance guide and media. See hole layout for result. If available, click icons to view media.
The start of a majestic finish towards the lagoon, takes plenty courage to aim down right side of fairway with OB in play, aim at the chimney behind the green. The most undulating green on the course with a deep swale front left.
16 |
|
|||||||||
|
|
Buttons toggle between distance guide and media. See hole layout for result. If available, click icons to view media.
If you're confident with driver it's reachable but the nets down the left catch more balls than the green, the smart shot is a reliable iron to give you 100m into a large green and an easy par.
17 |
|
|||||||||
|
|
Buttons toggle between distance guide and media. See hole layout for result. If available, click icons to view media.
One of SA's greatest par 3's, Take a breather and enjoy the setting, the members shot is to aim for the left bank and watch the ball run down towards the hole. Miss right and it could be a big number.
18 |
|
|||||||||
|
|
Buttons toggle between distance guide and media. See hole layout for result. If available, click icons to view media.
A spectacular finishing par 5 that those who lose focus may not finish. Driving accuracy is key and wind plays a huge role in determining your 2nd shot, The tee box is aiming at the green and the fairway is on a slight curve starting out left and dog legging right towards the green, Aim at the big tree. Keep out of the full length fairway bunker right and a good finish is on the cards. Make use of the bailout area left of the green for a 2nd long shot attempt.